Integrations Quick Start Guide
This guide describes how to integrate any tool or platform within SmartFlows. Learn more about:
Overview
Pull valuable data into your flow, or send new data out of your flow, by integrating any tool or platform your team is already using with SmartFlows. From AI bots to CRM platforms to SaaS products, any tool with publicly available APIs can be used with SmartFlows. By integrating other services with SmartFlows you can bolster your flow with additional data and trigger actions in other systems, taking your workflows to the next level.
The possibilities are basically endless, and fully customizable based on your business needs. But here are a few examples of how you could leverage an integration with SmartFlows:
-
Initiate a flow from an external source (e.g., when a customer reaches out to you on a social media channel, the interaction is automatically managed by your flow)
-
Bring important information from your system of record into the flow (e.g., query your database for a customer’s location to provide local services)
-
Kick off an action in another system from your flow (e.g., create a new record in your CRM)
-
Pull additional AI capabilities into your flow (e.g., efficiently connect customers to the right information or person using the bot of your choice)
Integrate with SmartFlows
Before You Begin
You'll need to have a few elements in place prior to integrating your tool or platform with SmartFlows:
-
An IntelePeer account. Sign up for an account here.
-
An account with the tool or platform of your choice.
-
We recommend having your account information (username and password) and relevant API information (authorization/key, specific endpoint method and URL, and expected response data) on hand.
-
You may also want to familiarize yourself with what, if any, actions may be needed on the side of your tool or platform (e.g., you may have to perform additional registration to access your API key). Check their available documentation for any information regarding specific requirements or dependencies on their side.
-
Build Your Flow
We offer two types of integrations: direct and indirect.
Direct Integrations
Building a flow with a direct integration streamlines the configuration process for you automatically. We’ve already set up a few things behind the scenes, so you just have to drag and drop the applicable action into your flow and update the Inputs section of the Configurations Panel.
Direct integrations are available for Lex Bot and Watson Assistant bot.
Indirect Integrations
Indirect integrations are built from scratch using the External Web Call or Inbound API action.
External Web Call
Use this action to connect your flow to an external source. You can include the External Web Call in the middle of your flow (e.g., to pull data about a caller into the flow) or at the end of your flow (e.g., to send data about the interaction to your tool or platform). See the Sample Integration Flow below for an example of how the External Web Call could be used in a flow.
External Web Call Action Inputs
Note: All of the inputs associated with the External Web Call action are listed below, but some inputs are dependent on other fields and might not initially appear (e.g., the Body field does not appear if you are using the "GET" Method).
|
Input Name |
Description |
|---|---|
|
Add Headers |
|
|
Key |
In this text box, add in the label of any necessary authorization token, key, or metadata being sent (e.g., “Authorization”). Click on the blue plus sign button to add more keys and associated values. |
|
Value |
In this text box, add in the literal value associated with the key (e.g., with our “Authorization” Key above the Value might be “Bearer abC0dEF...”). |
|
Basic Auth |
|
|
Username |
Your username associated with the external source. |
|
Password |
Your password associated with the external source. |
|
OAuth 2.0 |
|
|
Grant Type* |
Currently, only "client credentials" is supported. |
|
Scope |
Specify one or more pieces of source data the flow can access. For example, when connecting a flow to a CRM, users might need to confirm access to past purchases on their account, the contact information associated with their account, etc. |
|
Client ID* |
Enter the OAuth ID provided by the source you want to connect your flow to. |
|
Client Secret* |
Enter the password provided by the source you want to connect your flow to. |
|
Token Method* |
Currently, only "POST" is supported. |
|
Token URL* |
Enter the URL provided by the source you want to connect your flow to, in order to access the token. |
|
Content Type* |
Currently, only "application/x-www-form-urlencoded" content is supported. |
|
Request |
|
|
Method* |
Choose one of the following options:
|
|
Timeout* |
The duration, in seconds, SmartFlows will wait for a response before failing the request. Must be a value from 1-200 seconds. This field is set to 10 seconds by default, but most requests are returned in less than a second. |
|
URL of Service* |
The base URL for the external source API endpoint. |
|
Content Type |
The format of the information being sent to the external system. Select the appropriate format from the drop-down list. |
|
Body |
Type the body of your request into the text box. This field will not appear if you select the "omit (no content type or body)" Content Type. |
|
Test HTTP Request |
Click this button to test out or troubleshoot your request. |
|
Response Variables |
|
|
Name |
In the text box, type in any values you plan to pull in from the response your external source sends. You can then use these as variables downstream in your flow. Click the blue plus sign button to add more Name and associated Query Expression variable fields. |
|
Query Expression |
Map the variable name to the response from your external source. In the text box, type in the exact property labels returned in the response. |
|
Play hold music |
Click this check box to play hold music until a response is received. When this check box is selected, the Configure Audio button appears. Default audio is automatically assigned or you can include custom audio or a TTS message via the Audio Settings pop-up. |
Inbound API
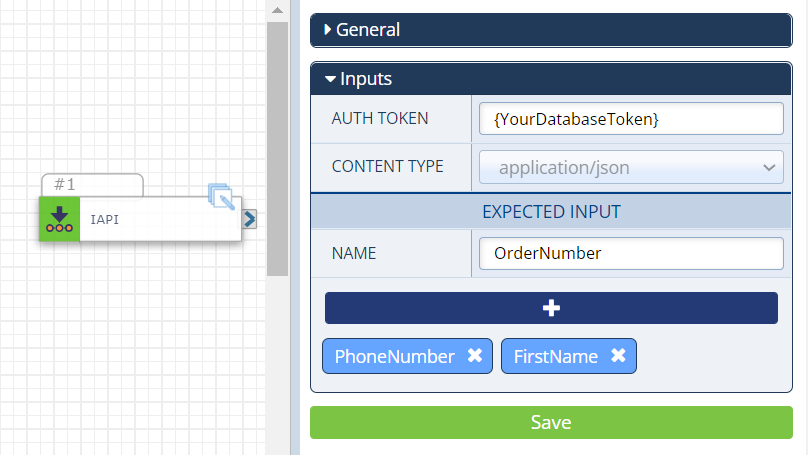
Use this trigger action to kick off your flow from an external source. For example, when a customer’s order is ready for pick up and the order status changes to “Ready” in your database, your flow in SmartFlows is automatically initiated to send an SMS to the customer letting them know their order is available.
In this example, the Inbound API action is used to initiate your flow from the external database, and pulls customer information (e.g., phone number, first name, and order number) into the flow via the Expected Input field. Those Expected Input values are then used as variables in the Send SMS action configurations.

Inbound API Action Inputs
| Input Name | Description |
|---|---|
| Auth Token | The authentication token from your external source (e.g., database, tool, platform, etc.). |
| Content Type | Only JSON format is accepted at this time. |
| Expected Input | |
| Name |
In the text box, type in any values you plan to pull in from your external source. Then click the blue plus sign button to add it. You can use these as variables downstream in your flow. Note: These must be an exact match with your external source (e.g., if your database sends an “OrderNo” but you add the Expected Input “OrderNumber” the value will not be pulled in successfully). The correct case must also be used (e.g., "OrderNo" will not match "orderno"). |
Your External Source
The instructions above cover how your workflow might be configured in SmartFlows, but for the Inbound API action to work, you also need to configure your external source. Your external source (database, tool, platform, etc.) must also be configured to send an API call to SmartFlows, which would initiate your flow.
In general, follow the conventions below:
Base URL: https://api.intelepeer.com/_rest/v4/sfgen/apitriggers
Method: POST
Note: Any values added to the Expected Input Name field should be sent in the API call via the other parameters using the “${expectedinput}” format (e.g., “$OrderNumber”).
Check out the Trigger a Flow API page for more details. We also recommend reviewing the documentation provided by your specific external source for more information.
Sample Integration Flow
Say you would like your hotel guests to be able to receive the weather forecast via text message. Your guests send an SMS to your weather hotline, and receive an SMS back with the temperature, wind speed, and forecast. To pull the weather data into your flow, an integration with the National Weather Service is configured. This is one way you could build your flow:
-
Build your flow:
-
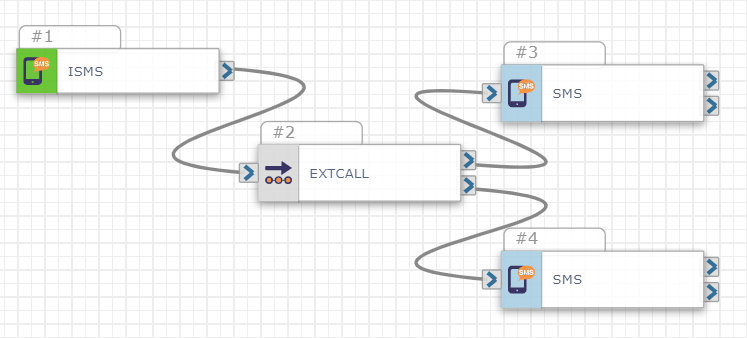
Inbound SMS/MMS: This action triggers, or kicks off, your flow. When an inbound text or multimedia message is received, your flow will begin.
Note: You can’t assign a number to your flow until it is deployed. So, we will come back to this action later.
-
External Web Call: This action integrates SmartFlows with the National Weather Service and will allow you to pull the weather data into your flow.
-
In this example, we will configure the Inputs in the Configurations Panel as follows:
-
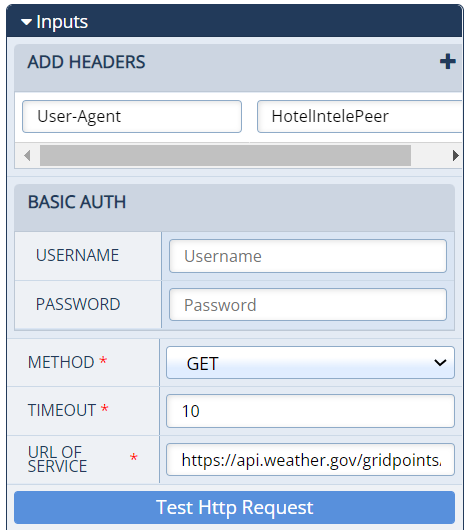
Add Headers:
-
In this example, the National Weather Service requires a User-Agent header.
-
In the Key text box add “User-Agent” and in the Value text box add the string of your choice.
-
-
Authentication Type Basic Auth:
-
We are using a publicly available open data service, so we can leave the Username and Password fields empty.
-
-
Request:
-
We are using the “GET” method so no update is needed for the Method field.
-
We will also stick with the default Timeout duration. If a response isn’t received within the default time, the flow will follow the On Failure path (the second exit port), and send an SMS letting the guest know we couldn’t complete their request (Send SMS action ID 4 below).
-
URL of Service: We are using the forecast endpoint: https://api.weather.gov/gridpoints/MFL/109,62/forecast
Note: The endpoint in this example is specific to our hotel location (via the grid points), so you cannot copy and paste this into your own flow without customizing the endpoint.
-
Content Type: We will stick with the default "application/json" option.
-
Body: We will leave this text box blank (sending an empty payload).
-
After you complete the fields above, you can click the Test Http Request button.
-
The Response pop-up appears with the data your request will return. We recommend reviewing the response to make sure your request is valid and all the data you expected to receive is included.
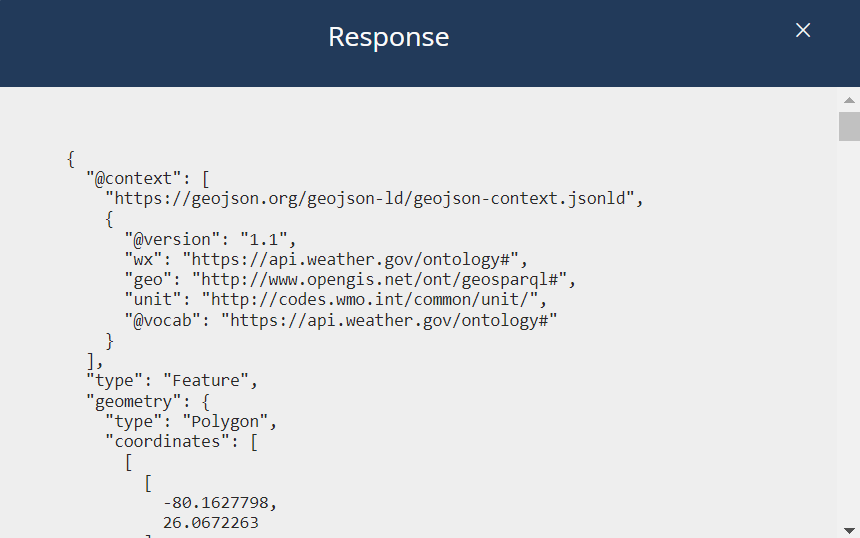
Note: You can also use this feature to confirm the exact properties you want to pull in via the Response Variables section (up next).
-
-
-
Response Variables:
-
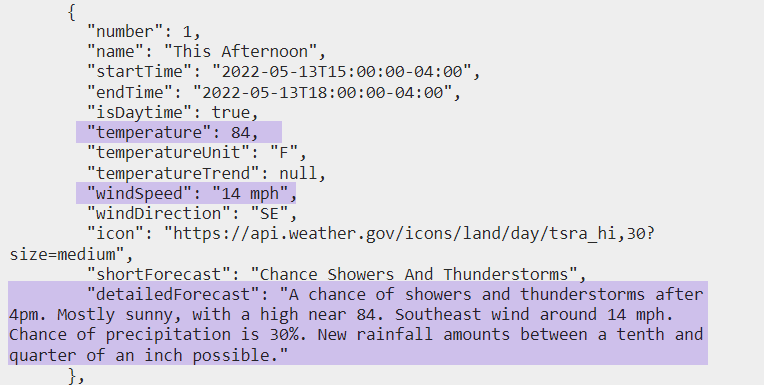
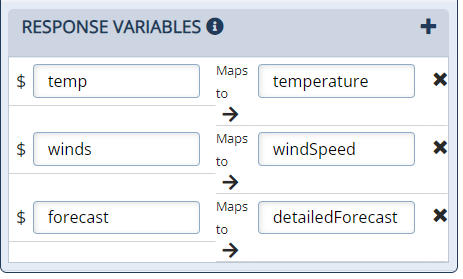
Name: We want to pull some data out of the response and use that in our text back to the guest. In the text box, we will create three new variables:
-
temp: the temperature value
-
winds: the wind speed
-
forecast: a description of the day’s forecast
-
-
Query Expression: The new variables will correspond to properties in the response. In the text box, we will enter the exact property labels returned in the response:
-
temperature
-
windSpeed
-
detailedForecast
-
Downstream in our flow, anywhere we use these variables, they will automatically be replaced with the actual value returned in the API response (e.g., if we use the $temp variable in our Send SMS action, the received message will say “84”).
-
-
-
Play hold music: In this example, our flow is SMS-based so we don't need to add hold audio. No update is needed.
-
-
-
-
Send SMS/MMS: (Action ID 3) This action sends a message when a response is successfully returned.
- Add the content of your text to the Message field in the Inputs section.
- In this example, our On Success text might be:
- "It’s currently $temp F with $winds winds. $forecast Enjoy your stay!"
- The actual message the guest would receive is:
- "It’s currently 84 F with 14 mph winds. A change of showers and thunderstorms after 4pm. Mostly sunny, with a high near 84. Southeast wind around 14 mph. Chance of precipitation is 30%. New rainfall amounts between a tenth and quarter of an inch possible. Enjoy your stay!"
- Send SMS/MMS: (Action ID 4) This action sends a message when an error is returned, or a response isn’t returned within the timeout period.
- Add the content of your text to the Message field in the Inputs section.
- In this example, our On Failure text might be:
- "We apologize for the inconvenience, but we couldn’t complete your request at this time. Please try again later.”
Your flow will look something like this:
-
Update the Flow Name to "Weather Forecast".
-
Click Save. After you see the “Saved Successfully!” message in green, click Deploy. The “Deployed Successfully!” message appears.
-
Now you’re ready to assign a number to your flow:
-
Click on the Inbound SMS/MMS action.
-
In the Configurations Panel, click Assign Number(s).
-
On the Number Assignment pop-up window, search or scroll through the listed numbers to find the correct one.
-
Click the check box next to the number you want to use. The Assign Flow and Clear Flow(s) buttons appear at the top of the numbers table.
-
Click the Assign Flow button.
-
After the green success message appears, exit the pop-up window. The assigned number now appears in the Inbound SMS/MMS action’s Inputs section.
-
Click Save.
-
Congratulations! Your flow and integration are ready to use. Any time the assigned number receives an SMS the flow will begin.
Tips
-
You can integrate any tool, platform, CRM, etc. with SmartFlows, as long as they provide REST APIs.
-
For indirect integrations, your flow must include the External Web Call or Inbound API action. This is what links your flow to the outside tool or platform.
-
For direct integrations, if you run into any issues, we recommend working with the IntelePeer Customer Success team to navigate the integrations process. Email customersuccess@intelepeer.com.
-
If you make any changes to your flow in SmartFlows, you must deploy your flow again so that the most recent version is available.
-
Testing out your API in Postman is a helpful way to confirm functionality is set up and working as intended.
-
We also recommend testing out your flow to confirm it is working as expected. Trigger the flow yourself to test the experience (e.g., if your flow begins with the Inbound SMS/MMS trigger action, send an SMS to the assigned number and go through all of the available paths).