Microsoft Teams SmartCommunicator™ Quick Start Guide
This guide describes how to set up and use the SmartCommunicator app. Learn more about:
Overview
Super-charge your Microsoft Teams experience with SmartCommunicator. This app allows you to streamline communications by combining two tools your team is already using: Microsoft Teams and IntelePeer.
Use SmartCommunicator to simplify your team’s communication workflow, increasing efficiency and productivity. For example, if your team is already using Microsoft Teams but using personal mobile devices to carry out business functions, SmartCommunicator provides key voice, SMS, and MMS features within Teams, centralizing communications with other apps they're already using.
Getting Started with SmartCommunicator
Before You Begin
You'll need to have a few elements in place prior to setting up the SmartCommunicator app:
-
An IntelePeer Account: Your team must have direct routing or Operator Connect through IntelePeer and all numbers used with the app must be 10DLC registered.
-
A Microsoft Teams Account: Your team should already have the Microsoft Teams desktop or mobile app (iOS or Android) installed.
Note: We support Microsoft Direct Routing and Microsoft Operator Connect customers.
-
Administrator access to your Microsoft Teams Account: The Teams Administrator is responsible for assigning phone numbers within Teams, adding the SmartCommunicator app, and granting access for team members to use it.
Set Up SmartCommunicator
-
Complete the SmartCommunicator Onboarding process.
-
The Teams Administrator adds the SmartCommunicator app, and manages access to it, within the Microsoft Teams admin center:
-
Log into the Microsoft Teams admin center.
-
Add the SmartCommunicator app.
-
Grant permissions to the app.
-
Update the Permission policies to grant team members access to SmartCommunicator.
-
Use Global permission to give everyone access or create a new policy group to give access to a subset of members.
-
-
Pin the app (optional but recommended).
-
-
When each employee accesses the app for the first time, they will undergo two step verification.
-
The user is prompted to enter the phone number associated with their Teams account and will receive a phone call with an input code. Once their code is confirmed, the user's information is automatically captured in the system.
-
And you're done! SmartCommunicator setup is complete and you can start using the app right away.
Using SmartCommunicator
Launch the App
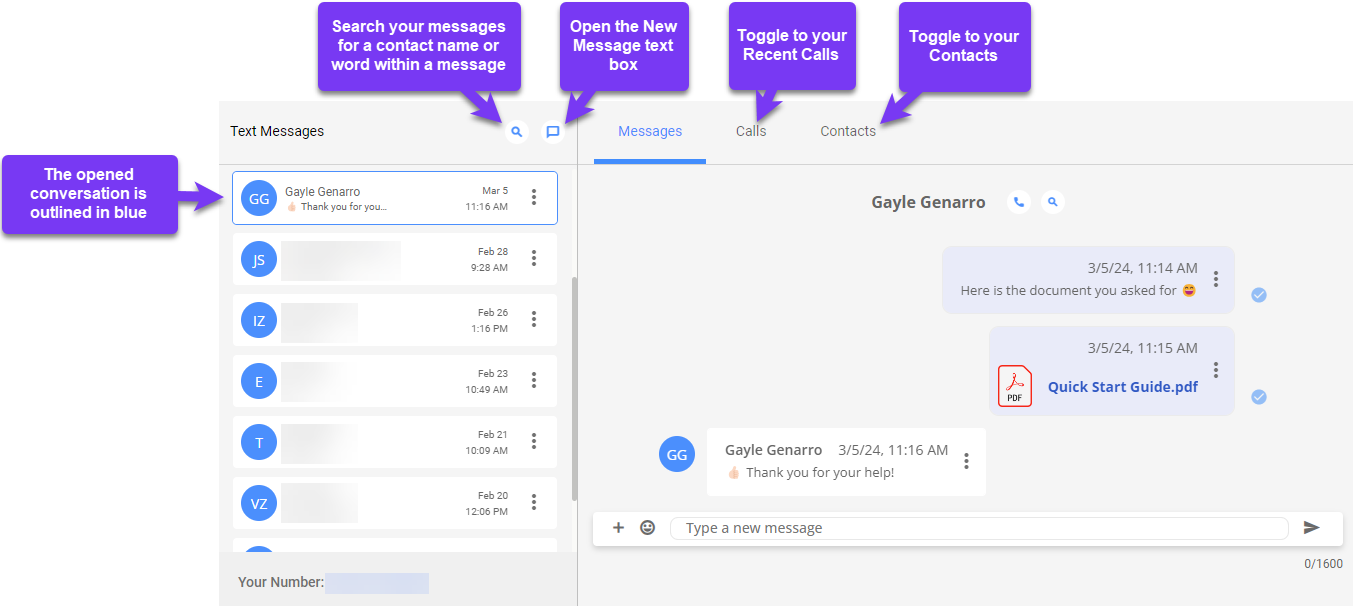
Select the SmartCommunicator icon from the app bar on the far left.
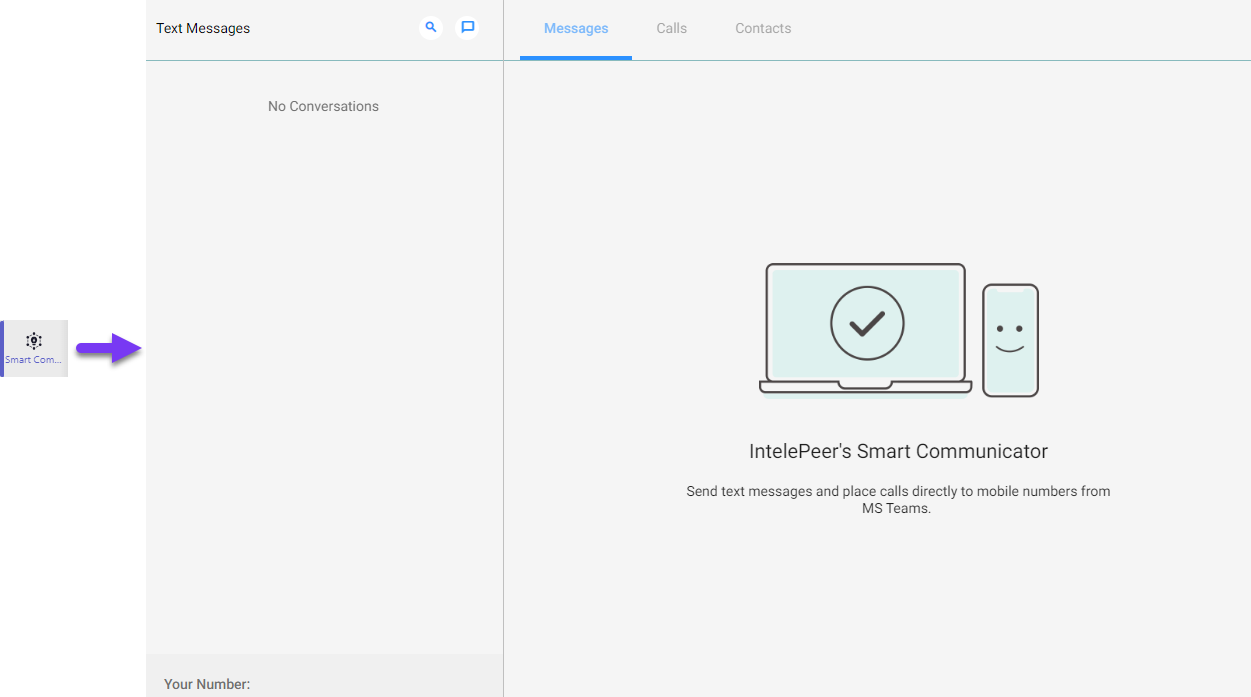
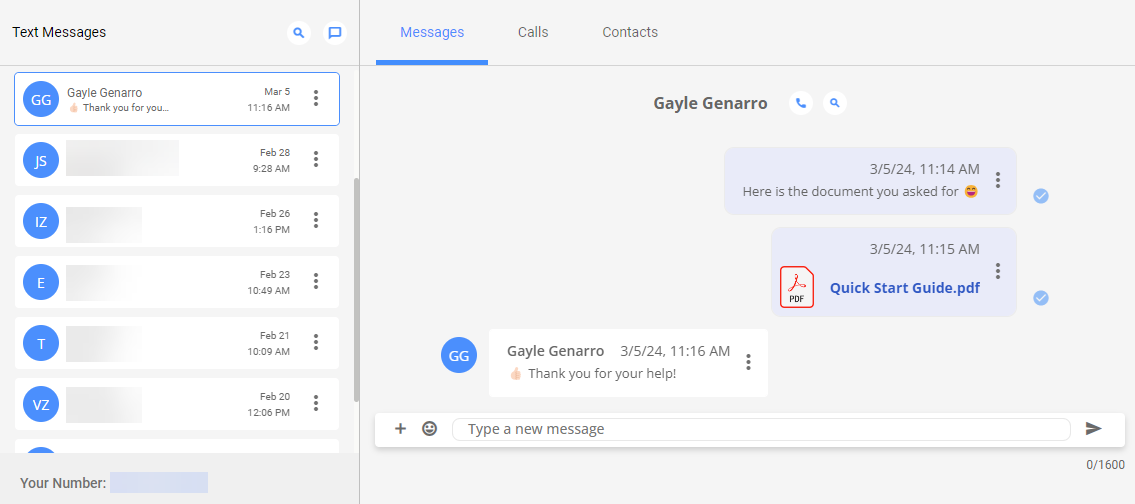
Any previous conversations appear on the left, and you can toggle between text messages, calls, and contacts.
Note: Some users may see additional tabs at the top of the app: Shared Inbox and Administrator. See the Shared Inbox section, below, for more information, and contact your CSM or Account Manager to set up admins within your organization.
Send and Receive Texts
To start a new conversation:
-
From the Text Messages menu, click the new message icon.

-
The New Message text box opens. You can find a contact by name or number, or enter a new phone number.

-
As you type a contact name or phone number in the text box, matching suggestions will appear. Click on a suggestion or type the full phone number in the text box, and then click the check mark icon.

-
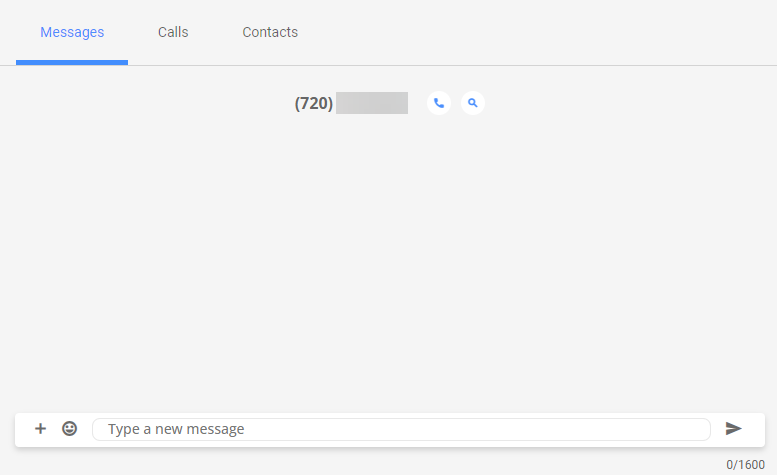
The new blank chat box opens.
-
Type your message in the text box and click the plus sign button to add a multimedia element, then click the send icon or hit the enter key.

Note: You can send and receive text, emojis, photos, PDFs, and gifs. You can send files up to 3.6 MB, but for files between 1 MB to 3.6 MB, a warning message will appear as your message may not be delivered due to mobile provider limitations. If you attempt to send a file greater than 3 MB you may experience an error, but we expect to resolve this issue soon.
To continue a previous conversation:
-
From the Text Messages menu, scroll through your previous conversations, or click the magnifying glass icon to search for the contact's name or a key word in a message.
-
Click on the previous conversation to open the chat box with that contact.
-
Type your message in the text box and click the plus sign button to add a multimedia element, then click the send icon or hit the enter key.
Mark a Message or Conversations as Unread/Read
Click the three vertical dots on the right side of a message or conversation thread to mark messages as unread or read.
When you mark a conversation as unread, red notification bubbles appear on the conversation thread tile and the tab.

When you mark a message as unread, a red “unread” label appears next to the individual message.

You can click the three vertical dots icon for a previously marked as unread conversation or message and select “Mark as Read” or navigate away from the conversation and open it back up again, to remove the notification bubbles and “unread” label.
Delete and Restore Messages
Click the three vertical dots on the right side of a message to delete it.

You can delete both sent and received messages.
Once a message is deleted, the Undo button appears. You can restore previously deleted messages within seven days. After seven days have passed, the message is permanently deleted.

Notifications
When you receive messages, you'll see a red notification on the far left. When using the desktop version of the app, an additional pop-up notification will appear on the bottom right corner of your screen.
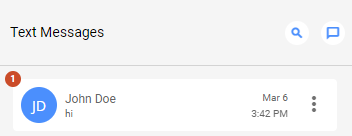
The notification number represents how many new messages you've received from a given contact. Click on the conversation to view the new message(s) and respond.
Note: When you receive a multimedia message, click on the file to download it to the appropriate location on your device. Once the file is downloaded and initially opened, a preview of the file will appear in the chat box.
SmartCommunicator notifications also appear in the Microsoft Teams Activity feed.
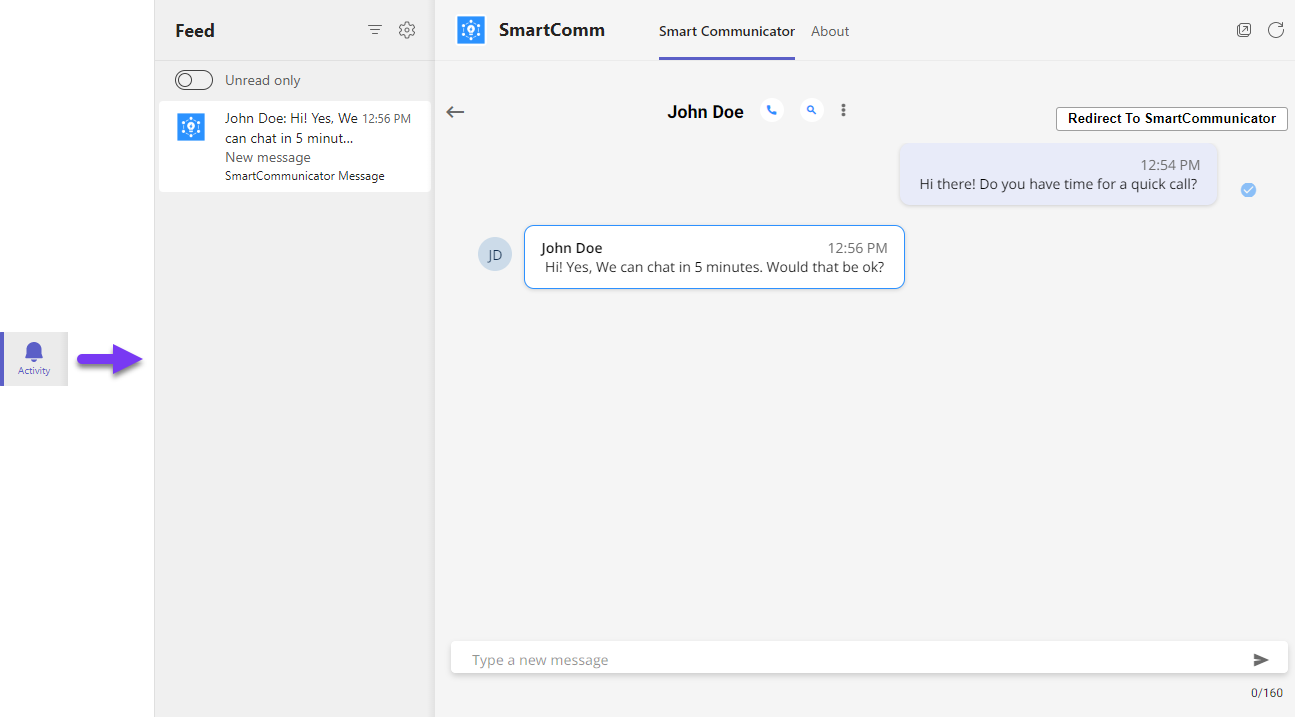
From the Activity feed you can open new messages and reply to messages.
Start and Receive Calls
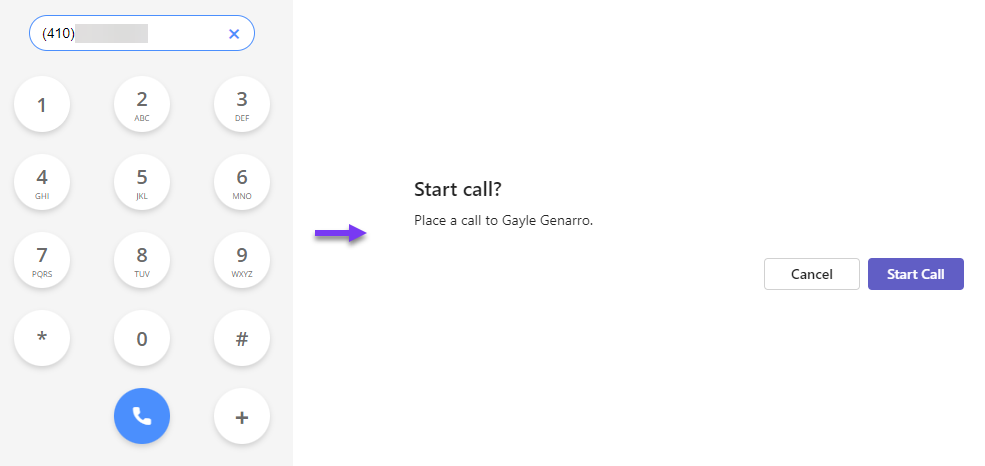
To initiate a phone call:
-
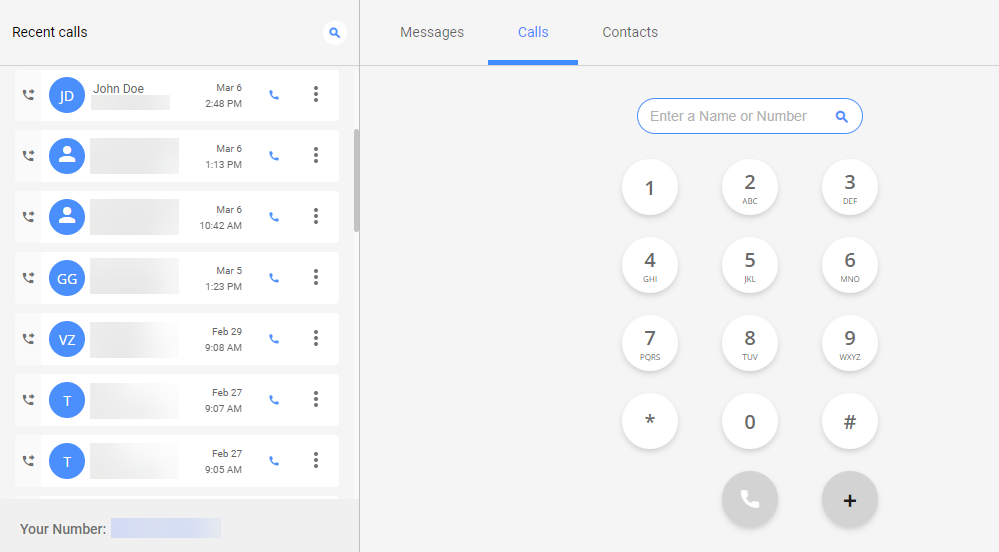
Select the Calls menu option.

Your Recent Calls history appears on the left and the dial pad on the right.
-
You have three options:
-
Click the blue phone icon to the right of any recent contacts to initiate a new call.

-
Use the search bar (above the dial pad) to find the contact's name or phone number.
-
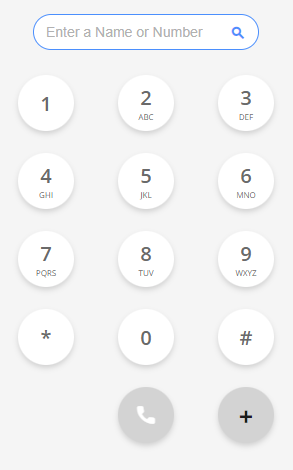
Or, use the dial pad to enter a new phone number.
-
-
Click the blue phone icon, and then click Start Call.
When you receive a call while using the desktop version of the app, a pop-up notification appears in the corner of your screen.
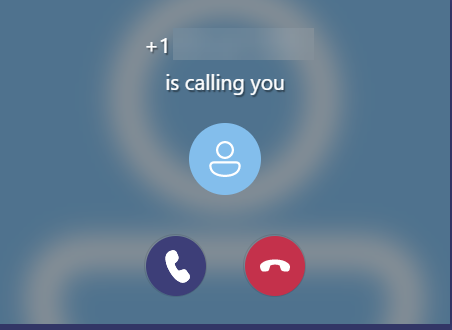
Click the Accept Call button, on the left, to open the call window.
SmartCommunicator Contacts
The Contacts menu option is where you can manage all of the folks you communicate with.
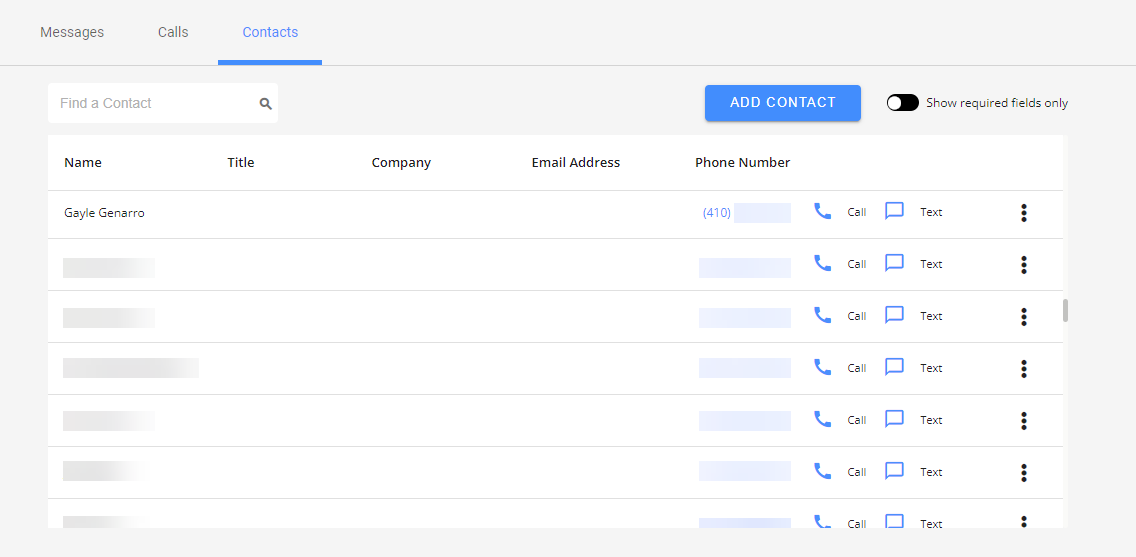
Here you can search or scroll to find a contact and start a new conversation. You can also add, edit, and delete contacts from this page.
You can request to enable integration between Microsoft Outlook and SmartCommunicator contacts. If this sync is on, when you create a new contact in SmartCommunicator, it will automatically appear in your Outlook contacts and vice versa.
Create a New Contact
You can create a new SmartCommunicator contact via the Contacts or Recent Calls menu.
Contacts
-
Select the Contacts menu option. A table of all of your existing contacts appears.
-
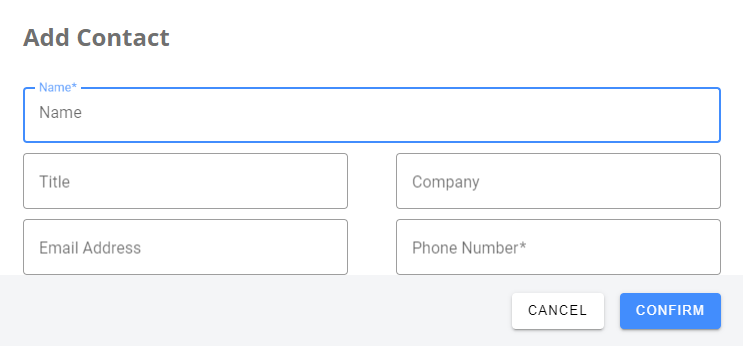
Click Add Contact.
-
The Add Contact pop-up appears. Fill in the contact details:
-
The Name and Phone Number fields are required.
-
The Phone Number field must contain 10 digits.
-
You must include at least three characters in the Name, Title, and Company fields.
-
An Email Address cannot be saved in all capital letters.
-
-
Click Confirm. Your new contact will appear in the table.
Recent Calls
-
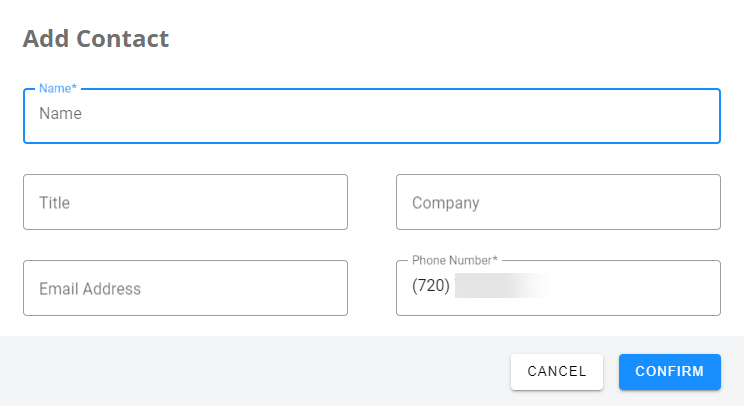
From the dial pad on the right, enter the new contact's phone number in the search bar and click the plus sign button.
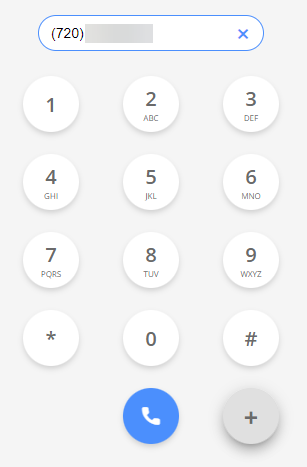
The Add Contact form appears.
-
Fill in the contact details.
-
The Name and Phone Number fields are required.
-
The Phone Number field is already populated with the number you entered via the dial pad. Note: This field must contain 10 digits.
-
You must include at least three characters in the Name, Title, and Company fields.
-
An Email Address cannot be saved in all capital letters.
-
-
Click Confirm. Your new contact appears in the table on the Contacts page.
Supervised Inbox
Supervised Inboxes allow an individual user and their managers or colleagues to message customers from one number.

If you are provisioned to have Supervised Inbox, you will see the Supervised Inbox tab at the top of the app.
Note: If you only have a Supervised Inbox, you won't see the Messages or Calls tabs. If your account includes an individual number and a Supervised Inbox number, you will see additional tabs based on your profile.
Within the tab, both the user and their manager(s) will see notifications for messages sent and received within each conversation thread. For example, if a customer sent two messages and a user replied twice, the manager would see four notifications in that conversation. Anyone in the inbox can view and respond to customer messages. The user and manager(s) can see who is sending each message within the app, while all messages will appear to be from the same number from the customer view.
You can also manage contacts in the Supervised Inbox tab view the three vertical dots icon.

Note: If a user saves a contact from this tab, it will only be saved for their account. Their manager, for example, would still see the unsaved number in the Supervised Inbox conversation thread.
Manager Notifications
Managers can turn on or off notification for the inboxes they supervise (not their own). By default, all managed inboxes are muted. Click the bell icon to unmute or mute a specific inbox.
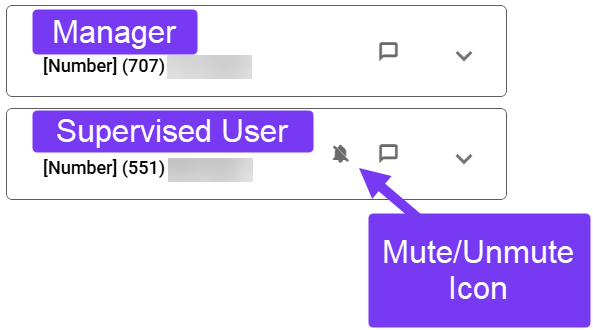
Note: Even when an inbox is muted, the red notification counter will still appear on the left side of the muted inbox tile.
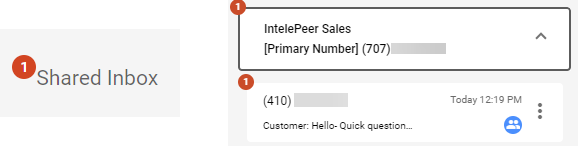
Shared Inbox
Depending on how your SmartCommunicator account is configured, you may have access to the Shared Inbox tab, where you can view and respond to messages as a group.
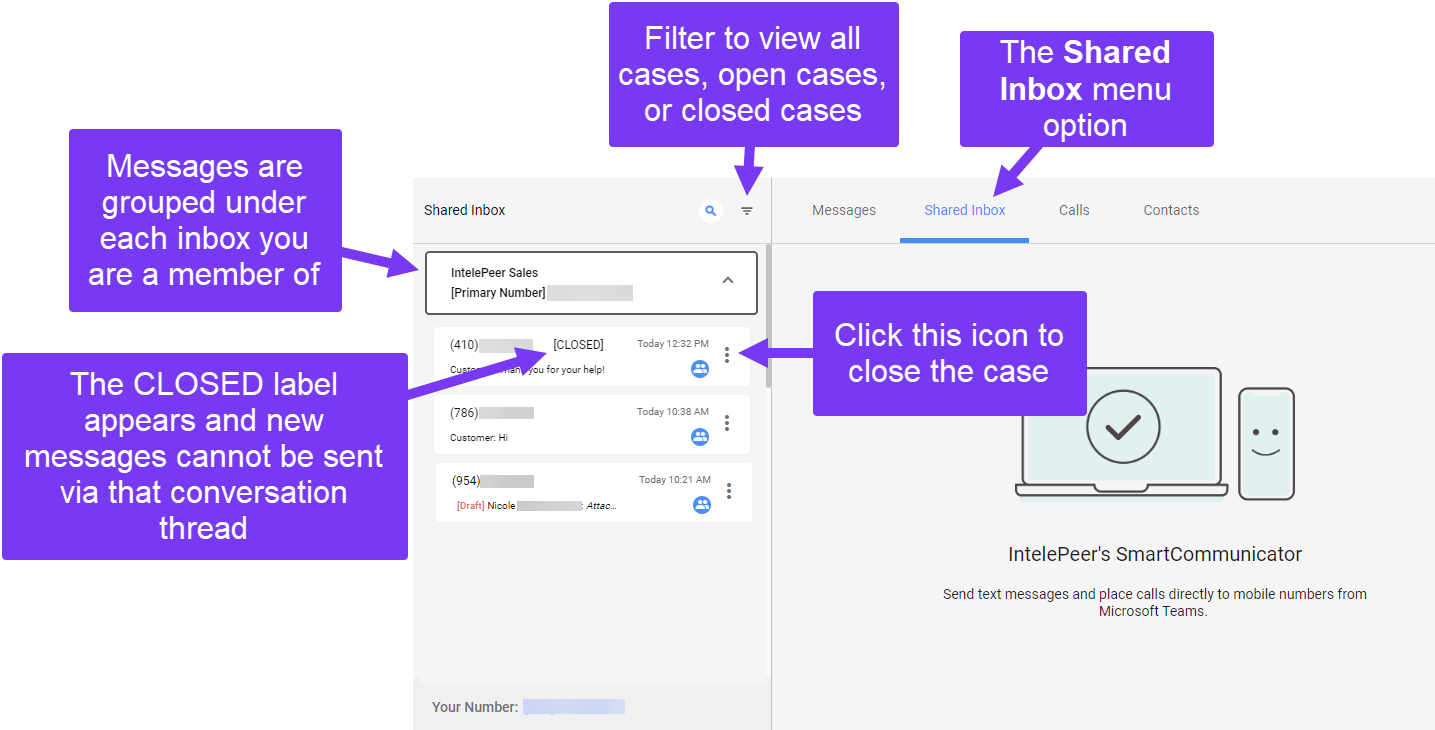
Within the Shared Inbox tab, any member within a designated group can read and respond to messages from a shared number (e.g., the main Sales number rather than individual Teams phone numbers). When you receive a new message, a red notification appears next to the Shared Inbox tab, next to the group mailbox tile, and next to the individual conversation thread. A notification also appears in the Teams Activity feed.
When you open a message, "Conversation with" and the customer's name appears at the top of the chat box. Hover over the heading to view the names of the group mailbox members.
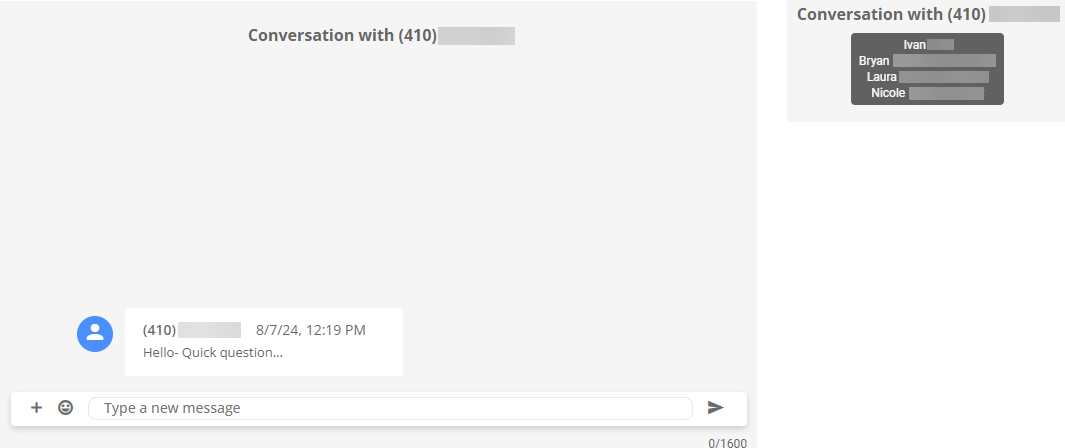
You can reply to the message or view any messages sent by the other group members in the chat box.
Message Templates
SmartCommunicator Administrators can create and manage templates for their team, allowing users to respond to frequent inquiries with standardized messages. For example, if you always want to end customer interactions the same way, you could create a "Thank You" template (e.g., "Thank you. Your request status has changed to Resolved. Please let us know if there is anything else you need help with.").
In the desktop app Admins will see the Templates section under the Administrator tab, where they can create and manage templates. You can assign each template to a specific brand (e.g., group, department, region, etc.) to make sure it's only available for the correct audience.

On the Messages tab, users can open a chat box and click the template icon to select the appropriate response. The standardized message automatically populates the message text box. The template language can be edited or immediately sent off to the customer.

Integrating with Insights
Once your team is up and running in SmartCommunicator, you can measure analytics around usage with the Insights SmartCommunicator dashboard.
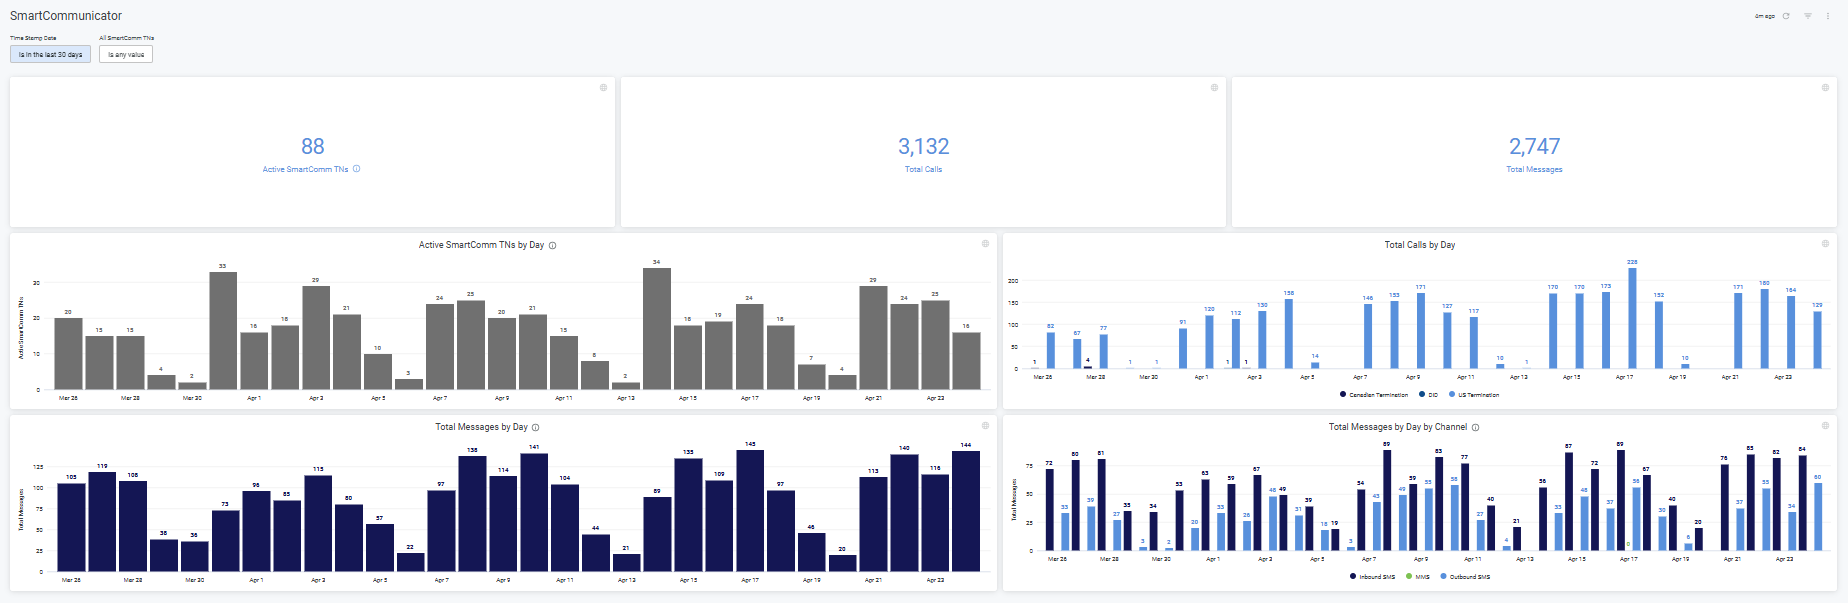
Filter your data by time period or specific telephone numbers to uncover trends and make adjustments as needed.
Check out this page for more details about the SmartCommunicator dashboard.
Errors
For more information, check out the Error Codes page.
Tips
-
If you run into any issues during onboarding or using the app, email support@intelepeer.com.
-
If you run into any issues while using the app, you may need to make sure your device meets the Microsoft Teams hardware requirements or clear your cache and restart Teams.
-
By default, new Teams apps are added to the bottom of the app bar (the menu on the far left). We recommend pinning the SmartCommunicator app to the top of the app bar so your team members can easily find it. Check out this page for more detailed information.
Note: After you change the default app order, it will take a few minutes to propagate to all accounts.
-
There are a few limitation to keep in mind when using the app that may impact your experience:
-
When using the app with custom display or magnification settings turned on, some SmartCommunicator features might not be visible. You may need to scroll to view all buttons, or revert to your device's default zoom configuration settings to view all screen elements.
-
SmartCommunicator may not receive files sent from iPhones. Check out this page for more information.
-
There is a character limit for inbound and outbound text messages, depending on device and carrier limitations. We recommend ensuring your text is less than 1,000 characters.
-
For more information regarding carrier limitations, check out the Verizon forum and AT&T forum.
-
-
Some emojis sent from an iPhone to SmartCommunicator do not appear consistently when the app is open on a Windows device. A blank space will appear instead of the sent emoji.
-
When an iPhone user sends a picture the format may arrive in SmartCommunicator in a different format. For example, an HEIC photo sent from an iPhone may convert to a JPG file in the app. To learn more about maintaining the original file format for iPhone photos, check out this page.
-
Audio files sent from iPhone users are converted to .amr file format, which is not supported in the app. The expected play button and track progress bar do not appear, but you can click on the file to download it and play it on your device.
-
Video files sent from iPhone users are converted to .3gp file format, which is not supported in the app. But you can click on the file to download it and play it on your device.
-
Reactions sent from cellphones to SmartCommunicator arrive as an SMS or MMS, depending on the device.
-
Reactions from iPhones appear as an SMS in the app (e.g., Liked "Have a great weekend!").
-
Reactions from Androids appear as an MMS in the app (e.g.,
 to "Have a great weekend!").
-
-
The various known issues between Android and iPhone operating systems may impact your experience. Learn more here.
-
On the Calls tab, more than ten digits can be entered via the dial pad. Only the first ten digits are displayed in the search bar, but when the phone icon is clicked, all digits appear in the pop-up message.
-
On the Contacts tab, uppercase letters should not be used in the search bar. Use all lowercase letters to find a contact, even if they were saved with uppercase letters (e.g., to find contact "Gayle Gennarro" you should search "gayle gennarro").
-
When using the mobile version of the app, the search bar on the Contacts tab only returns results matching a contact Name or Phone Number. The Title, Company, and Email Address fields are not included in the search.
-
Some banner and notification sound issues have been observed in the new version of Microsoft Teams. Since the new version of Teams is in beta, we are working with Microsoft to troubleshoot the issues.
-
There is an intermittent issue when pasting a telephone number in the New Message text box. Occasionally, the blue check mark button does not appear, and you can’t move on to send a message.
-
If you experience this issue, we recommend manually typing the entire number in the text box, or edit the number (e.g., delete the last digit of the number and retype it). The blue check mark should then appear, and you can continue with your message.
-
-
For more information about Microsoft Teams, check out:
For more information about SmartCommunicator, check out: