SmartQueuing
This guide describes how to configure and manage the Marketplace SmartQueuing app. Learn more about:
Overview
Use this app to hold incoming calls.
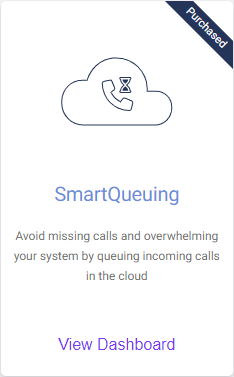
The SmartQueuing app allows you to create a virtual waiting room for incoming calls, ensuring your contact center isn't overwhelmed and calls are handled efficiently.
At a high level, complete the following steps to configure the SmartQueuing app:
-
Contact IntelePeer to purchase the app.
-
Add a new call group.
-
Add numbers to your routing profile.
Once the app is deployed, you can monitor your call group metrics and make updates as needed. We also recommend working with the IntelePeer Managed Services team to add enhanced call functionality to your SmartQueuing app. Bolster the caller experience with features like IVR, post-call survey, call back functionality, and more, as needed.
Check out IntelePeer SmartQueuing for more information.
Before You Begin
You'll need to have a few elements in place prior to configuring the SmartQueuing app:
-
Purchase the SmartQueuing app: Contact your IntelePeer sales representative or submit an inquiry via the IntelePeer SmartQueuing page.
-
Your Routing Profile: IntelePeer will create a call routing profile for you on the backend. These will be important later when you configure your call group(s). The Routing Profile will be titled “Cloud Routing {Unique Identifier}” (e.g., “Cloud Routing Main”).
-
Your Phone Numbers: Have any numbers you want to use with your contact center(s) on hand. You can use any numbers with this app, whether provisioned by IntelePeer or not.
The SmartQueuing Dashboard
When you click View Dashboard on the app tile, the SmartQueuing Dashboard appears.
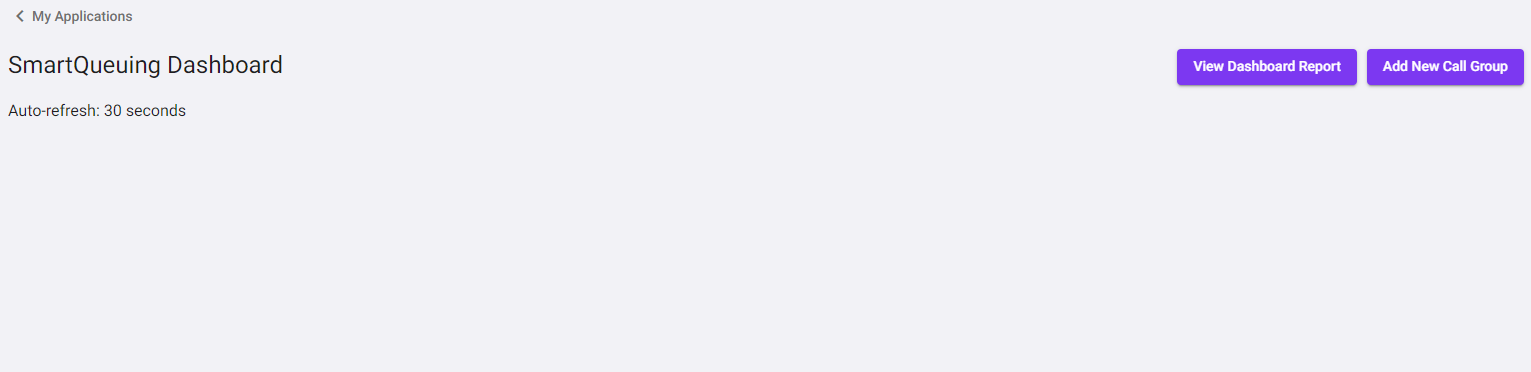
Note: The dashboard will be blank before you configure any call groups.
From this page you can:
-
Click Add New Call Group to create your call group(s).
-
Click View Dashboard Report to open the Call Group Detail Report. For more information, check out this page.
-
After you configure and deploy a call group, metrics and call group management options will appear on the dashboard. See Call Group Metrics and Management on the Dashboard below for more information.
At the top of the page, you'll also see overall metrics across all of your call groups:
-
Maximum Call Capacity: A percentage of overall active calls divided by the maximum call limit.
-
Overall Active Calls: The number of calls currently in progress (answered) + the number of calls currently queued, across all call groups.
-
Maximum Call Limit: The maximum call limit per your contract with IntelePeer.
Add New Call Group
Click the Add New Call Group button at the top of the SmartQueuing Dashboard and configure the following:
-
Call Group Name: Give your call group a unique and descriptive name.
-
Routing Profile: Select your routing profile ("Cloud Routing {Unique Identifier}") from the drop-down list.
Note: You'll only see one routing profile available. These are created by IntelePeer behind the scenes, so if you need additional profiles, reach out to your CSM.
-
Call Limit: Enter the number of simultaneous calls you want to transfer to your call center. Subsequent incoming calls will then be queued. For example, if you have a team of three available to receive calls your call limit would be 3, and the fourth concurrent call would be queued.
-
Transfer Number: Enter an alternative number to transfer calls to in the event of an issue (e.g., in the event your call center is experiencing a disruption or technical difficulties).
Note: If you leave this field blank, the call will be transferred back to the same number that was initially dialed (i.e., DNIS).
-
Call Group Audio: Assign a Text-to-Speech (TTS) message or previously recorded audio file to play when a caller is queued.
-
Hold Audio: Assign an audio message or music to play when a caller is on hold.
Note: The audio will repeat until the call is transferred to your call center.
-
Click Assign Audio.
-
For TTS: Make sure Audio Text (TTS) is selected at the top of the pop-up.
-
Use the default settings or select a Vendor and Voice from the drop-down list.
-
Type your message into the text box.
-
Click Assign.
-
Your message appears on the right side of the pop-up.
-
Click Close to exit the pop-up.
-
-
For prerecorded audio files: Make sure Audio Library is selected at the top of the pop-up.
Note: We recommend using an audio file longer than two minutes in duration, as this audio will be played on a loop.
-
Previously added audio files appear on the left side of the pop-up.
-
Click the plus sign button to add it.
-
The file appears on the right side of the pop-up.
-
Click Close to exit the pop-up.
-
-
To add a new audio file, click the upload icon.
-
The Flows page opens in a new browser tab.
-
From the menu on the far left, click Audio Library.
-
To the right, above the table, click Choose File. Find the appropriate WAV file on your computer and click the Open button.
-
Click the upload icon to add your WAV file to the audio library.
-
You'll see a new row in the Audio Library table for the new file.
-
Click on your Marketplace browser tab to navigate back to the Audio Settings pop-up.
-
Your new audio file will not automatically appear on the left side of the pop-up. Close the pop-up , click Assign Audio again, and select the Audio Library section.
-
Your new audio file now appears on the left side of the pop-up. Click the plus sign button to add it.
-
The file appears on the right side of the pop-up.
-
Click Close to exit the pop-up.
-
-
-
-
Timeout Audio: Assign an audio message to play when a caller reaches the maximum hold time.
Note: After this audio plays, the call will terminate.
-
Click Assign Audio.
-
For TTS: Make sure Audio Text (TTS) is selected at the top of the pop-up.
-
Use the default settings or select a Vendor and Voice from the drop-down list.
-
Type your message into the text box.
-
Click Assign.
-
Your message appears on the right side of the pop-up.
-
Click Close to exit the pop-up.
-
-
For prerecorded audio files: Make sure Audio Library is selected at the top of the pop-up.
-
Previously added audio files appear on the left side of the pop-up.
-
Click the plus sign button to add it.
-
The file appears on the right side of the pop-up.
-
Click Close to exit the pop-up.
-
-
To add a new audio file, click the upload icon.
-
The Flows page opens in a new browser tab.
-
From the menu on the far left, click Audio Library.
-
To the right, above the table, click Choose File. Find the appropriate WAV file on your computer and click the Open button.
-
Click the upload icon to add your WAV file to the audio library.
-
You'll see a new row in the Audio Library table for the new file.
-
Click on your Marketplace browser tab to navigate back to the Audio Settings pop-up.
-
Your new audio file will not automatically appear on the left side of the pop-up. Close the pop-up, click Assign Audio again, and select the Audio Library section.
-
Your new audio file now appears on the left side of the pop-up. Click the plus sign button to add it.
-
The file appears on the right side of the pop-up.
-
Click Close to exit the pop-up.
-
-
-
-
Disabled Call Group Audio: Assign an audio message to play when the call group is disabled (e.g., if your call center is closed for a holiday.
Note: After the audio plays, the call will terminate.
-
Click Assign Audio.
-
For TTS: Make sure Audio Text (TTS) is selected at the top of the pop-up.
-
Use the default settings or select a Vendor and Voice from the drop-down list.
-
Type your message into the text box.
-
Click Assign.
-
Your message appears on the right side of the pop-up.
-
Click Close to exit the pop-up.
-
-
For prerecorded audio files: Make sure Audio Library is selected at the top of the pop-up.
-
Previously added audio files appear on the left side of the pop-up.
-
Click the plus sign button to add it.
-
The file appears on the right side of the pop-up.
-
Click Close to exit the pop-up.
-
-
To add a new audio file, click the upload icon.
-
The Flows page opens in a new browser tab.
-
From the menu on the far left, click Audio Library.
-
To the right, above the table, click Choose File. Find the appropriate WAV file on your computer and click the Open button.
-
Click the upload icon to add your WAV file to the audio library.
-
You'll see a new row in the Audio Library table for the new file.
-
Click on your Marketplace browser tab to navigate back to the Audio Settings pop-up.
-
Your new audio file will not automatically appear on the left side of the pop-up. Close the pop-up, click Assign Audio again, and select the Audio Library section.
-
Your new audio file now appears on the left side of the pop-up. Click the plus sign button to add it.
-
The file appears on the right side of the pop-up.
-
Click Close to exit the pop-up.
-
-
-
-
General Failure Audio: Assign an audio message to play when there is an unexpected error, or the call cannot be transferred to the call center.
Note: After this audio plays, the call will terminate.
-
Click Assign Audio.
-
For TTS: Make sure Audio Text (TTS) is selected at the top of the pop-up.
-
Use the default settings or select a Vendor and Voice from the drop-down list.
-
Type your message into the text box.
-
Click Assign.
-
Your message appears on the right side of the pop-up.
-
Click Close to exit the pop-up.
-
-
For prerecorded audio files: Make sure Audio Library is selected at the top of the pop-up.
-
Previously added audio files appear on the left side of the pop-up.
-
Click the plus sign button to add it.
-
The file appears on the right side of the pop-up.
-
Click Close to exit the pop-up.
-
-
To add a new audio file, click the upload icon.
-
The Flows page opens in a new browser tab.
-
From the menu on the far left, click Audio Library.
-
To the right, above the table, click Choose File. Find the appropriate WAV file on your computer and click the Open button.
-
Click the upload icon to add your WAV file to the audio library.
-
You'll see a new row in the Audio Library table for the new file.
-
Click on your Marketplace browser tab to navigate back to the Audio Settings pop-up.
-
Your new audio file will not automatically appear on the left side of the pop-up. Close the pop-up, click Assign Audio again, and select the Audio Library section.
-
Your new audio file now appears on the left side of the pop-up. Click the plus sign button to add it.
-
The file appears on the right side of the pop-up.
-
Click Close to exit the pop-up.
-
-
-
-
-
Click Save, to confirm your changes, or Deploy if your call group is ready to be live.
Note: It will take up to 30 seconds for your call group to fully deploy
Once your call group is configured and deployed, you’re ready to assign phone number(s) to it.
Number Management
Each Routing Profile has numbers assigned to it. Click the Manage Number button on the call group tile to view and manage the assigned numbers. You can also manage the numbers associated with your routing profile on the “Manage My Numbers – {Routing Profile Name}” tab within the Marketplace.

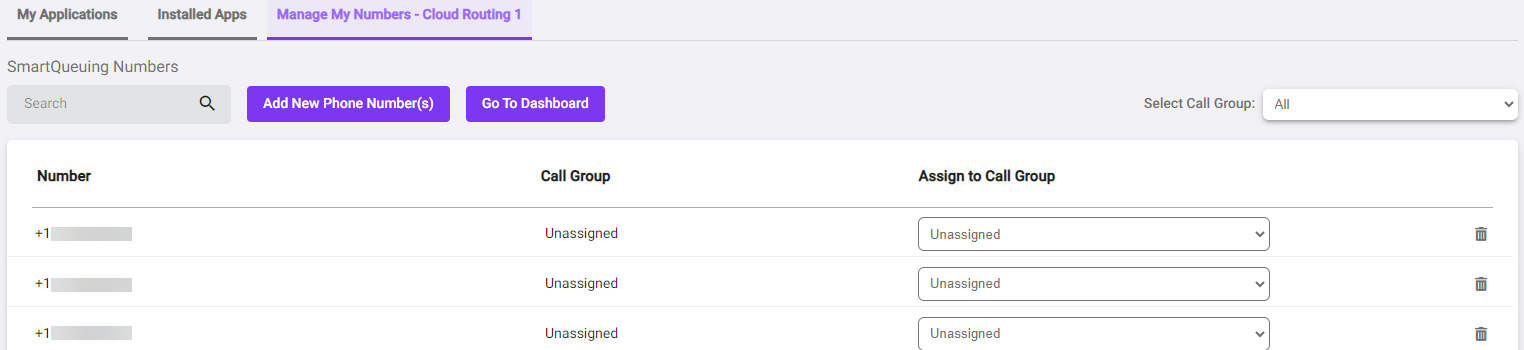
Note: The first time you open the tab, it will be blank and no numbers will be associated with the routing profile.
Click Add New Phone Number(s) to associate a number with your routing profile. The Add a New Phone Number pop-up appears.
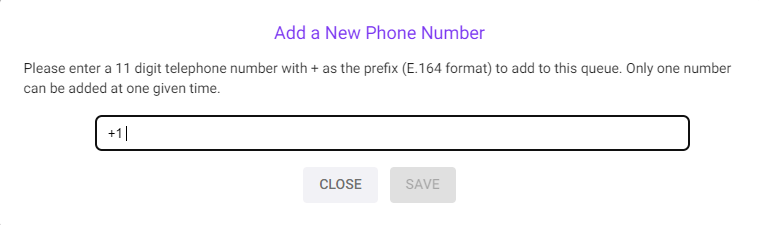
Enter your number in the text box and click Save. Once your number is successfully added, a green success message will appear below the text box. You can continue to add more phone numbers or click the Close button to exit the pop-up.
All of your added numbers will appear in the Manage My Numbers table. In the Call Group and Assign to Call Group columns, newly added numbers will appear as “Unassigned”.

Use the drop-down list to select the appropriate call group you want to assign each number to, and click Continue on the confirmation pop-up.
Note: The Assign to Call Group drop-down list will only display call groups that are configured with the appropriate Routing Profile in Step 2 (e.g., if you had two routing profiles (Cloud Routing 1 and Cloud Routing 2) and were on the Manage My Numbers – Cloud Routing 1 tab, only the call groups with Cloud Routing 1 assigned in Step 2 would appear in the drop-down list).
Once your number is assigned to the call group, incoming calls to that number will be transferred or queued as configured.
Call Group Metrics and Management on the Dashboard
After you save a call group, a new tile will appear on the SmartQueuing Dashboard. All tile features won’t be available until your call group is fully deployed.

The call group tile displays:
-
The Call Group Name on the top left.
-
The status icon on the top right: When the status icon is green, your call group is live and deployed. If the status icon is red, your call group is disabled. Click on the icon to update the status.
-
Call Limit: The percentage and progress bar display the number of calls currently in progress divided by the call capacity for that call group.
-
The number of concurrent calls occurring.
-
The Change Concurrent Call Limit button: Click this button to update the concurrent call limit for the call group.
-
The Configure button: Click this button to view all of the call group configurations. You can also update the Transfer Number and Call Group Audio.
Note: The Call Limit can only be updated by clicking the Change Concurrent Call Limit button (above) and the Call Group Name and Routing Profile configurations cannot be updated once the call group is initially deployed.
-
The View Queue Report button: Click this button to view the Call Group Detail Report. For more information about the report, check out this page.
-
The Manage Number button: Click this button to manage the numbers associated with this call group. See the Number Management section above for more information.
-
The Delete icon: Click this icon to delete the call group.
Note: You cannot recover the call group after it is deleted.
You can also click on the tile to view all of the call group configurations.
Tips
-
We recommend working with the IntelePeer Managed Services team to take your SmartQueuing app to the next level, by adding complementary functionality (i.e., add IVR, post-call survey, call back functionality, etc.).
-
If you need an additional Routing Profile, reach out to your CSM.
-
The audio you configure in the Hold Audio section will repeat, so we recommend using audio files longer than two minutes in duration.
-
Once your new call group is deployed, you cannot update the Call Group Name or Routing Profile. Click the Change Concurrent Call Limit button on the call group tile to update the Call Limit field or click the Configure button on the call group tile to update the Transfer Number and Call Group Audio.
For more information about SmartQueuing or the Marketplace check out: