Transfer
The Transfer action allows you to move your flow to a different phone line.
The functionality of the Transfer action is very similar to the Dial action, but Transfer has transfer/whisper audio capability. Transfer audio is played for the party being transferred. Whisper audio is played only to the party receiving the transfer (e.g., agent or receptionist).
Available Variables
Available Variables are placeholders for information that are automatically determined based on the contents of your flow. For example, if your flow begins with an Inbound Call trigger, the caller's phone number is stored as a $ANI variable. Later on in your flow, you can send a follow up SMS to the caller by adding the $ANI variable in the Send SMS/MMS action Inputs.
Check out How to Use Variables in SmartFlows for more information.
Inputs
| Input Name | Description |
|---|---|
| Transfer To #* | The number the flow moves to. *This is a required field. |
| Send DTMF After Answer |
Include known DTMF (e.g., extension for a specific department or meeting code for a conference call) needed to progress to the subsequent step in the flow. Note: This field is limited to 32 digits and any commas are interpreted as a one second pause. |
| Specify From #* | Use the magnifying glass icon to choose the appropriate number from your inventory. *This is a required field. |
| Timeout (Sec) | If the transfer is not answered by the time interval specified, it will follow the “No Answer” course of the flow. The default value is 45 seconds. |
|
Enable DTMF Accept/Reject |
Click this check box to allow the called party to accept or reject the transferred call. Then, in the Menu Digit section, specify which digits correspond to accept (Accept/Ans) and reject (Reject/NoAns). Note: You cannot use DTMF Accept/Reject in conjunction with the Private Channel Input below. |
|
Specify Digit to Enter Private Channel |
Temporarily move the caller to a private channel, where they can input sensitive data that is masked from the called party (e.g., a caller’s credit card number is masked from the agent). Choose the appropriate digit from the drop-down menu and click the plus sign button. A new port for the selected digit path will appear. An action or actions connected to a Private Channel port must always loop back to this Transfer action (the action they are routing from). A new Transfer action cannot be connected to a Private Channel port. Note: You cannot use Private Channel in conjunction with the DTMF Accept/Reject Input above. Multiple private channel digits and corresponding ports can be added. |
| VM Detection | Use this check box to differentiate the path of your flow if the transferred call goes to voicemail. A new exit port appears and can be connected to a voicemail specific pre-recorded audio file or you can send the call to someone else. |
| Record Channel | Select this check box to create a recording of the entire channel (i.e., all parties on a call) and create a variable that can be used later in the flow. |
| Record Utterance | Use this check box to record the caller’s speech in small snippets to feed into speech recognition for the “On Answer” course of the flow. |
Configure Audio
You can configure Transfer audio at the action level (one at a time) or at the flow level (automatically applied to any Transfer actions across your flow).
Note: Whisper audio can only be configured at the Transfer action level.
Action Level Configuration
Click on the Transfer action, then Configure Audio within the configurations panel to build your transfer and whisper audio options.
-
Transfer: Audio played to the caller before the transfer happens
-
Whisper: Audio played to the party receiving the transfer (e.g., agent or receptionist)
-
Audio Text (TTS): Select if you would like to use Text-to-Speech (TTS) for the Transfer audio, Whisper audio, or both. Then use your default Text-to-Speech settings or select your preferred vendor and voice. Finally, type your message into the text box and click the blue “+” sign.
-
Audio Library: Add new or drag and drop existing audio files from the library to the Transfer or Whisper sections.
Flow Level Configuration
Click on any blank space within the board, then click Configure Audio within the Default Audio section of the configurations panel to build your transfer audio options.
Note: Default Transfer audio will be applied to any Transfer action in the flow, but any configurations made at the action level will override the default audio settings.
-
Audio Text (TTS): Select if you would like to use Text-to-Speech (TTS) for the Transfer audio. Then use the default Text-to-Speech settings or select your preferred vendor and voice. Finally, type your message into the text box and click the blue “+” sign.
-
Audio Library: Add new or drag and drop existing audio files from the library to the Transfer section.
Hold Audio
Under the Transfer section of the Audio Settings pop-up, use the Choose Wait Time Audio drop-down list to configure audio to play while a call is transferred. Transfer hold music can be configured at the action level or the flow level.
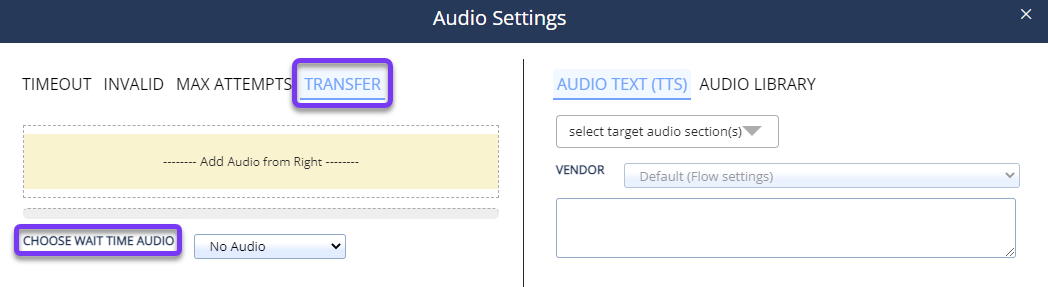
Choose between a ringback tone, hold music, or silence. If you select hold music, you can then assign a Text-to-Speech message or audio file to be played.
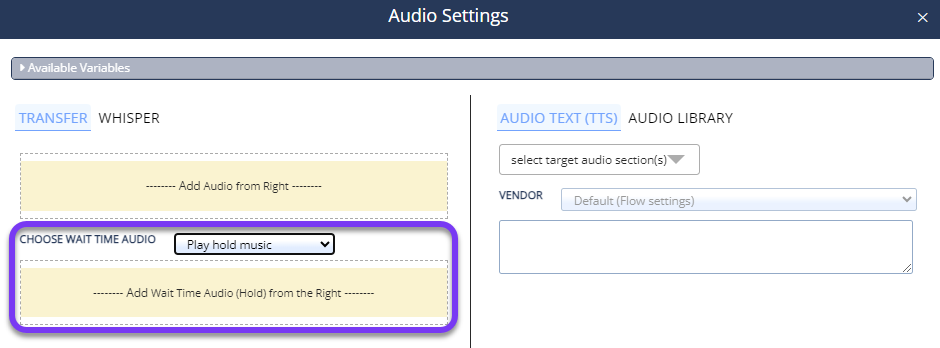
By default, "No Audio" is assigned at the flow level and the action level configuration defaults to the flow level configuration.
Check out Configure Audio Settings for more information.
Advanced
Include advanced User to User Information (UUI) options as needed for your flow.
| Input Name | Description |
|---|---|
| UUI Encoding | Supported encoding methods for UUI header. |
| UUI Header | Add additional unique identifiers in the request when transferring a call. |
| Diversion Header | Add static information or a variable and pass that into the diversion header. |
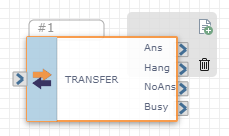
Action
Each Transfer action includes four default exit ports corresponding to the following outcomes:
-
On Answer: The course of the flow if the transfer is answered (port 1)
-
On Hangup: The course of the flow if the transfer is disconnected (port 2)
-
No Answer: The course of the flow if the transfer is not answered by the time defined in the Timeout input (port 3)
-
On User Busy: The course of the flow if the called number is busy (port 4)
If you select the VM Detection check box in the Inputs section an additional export port appears:
-
On Voice Message: The course of the flow if the transfer goes to voicemail (port 5)
If you select a Private Channel digit in the Inputs sections an additional export port appears (e.g., if you select "9" as a Private Channel digit, port 6 labeled "9" will appear and you can specify the course of the flow when "9" is selected). An action or actions connected to a Private Channel port must always loop back to this Transfer action. A new Transfer action cannot be connected to a Private Channel port.
Note: Multiple private channel digits and corresponding ports can be added.
The port order cannot be rearranged.