How to Build a Block Agent
This guide describes how to configure a Block Agent workflow. Learn more about:
Overview
The Block Agent workflow uses a graph data structure, allowing you to build complex agents in a simpler way. You can configure a Block Agent to respond to multiple topics and move through steps within each topic. Build via JSON input defining each component of the workflow, one Block Agent can simplify unwieldy SmartFlows projects and provide overall improved performance.
For example, you could build an appointment management Block Agent workflow where your agent identifies the caller’s intent (Block 1), helps customers authenticate themselves (Block 2), schedules a new appointment (Block 3), confirms an upcoming appointment (Block 4), etc. Within the authentication Block, the agent leads the caller through the steps of providing their name (Turn 1), confirming their date of birth (Turn 2), and providing their security pin (Turn 3). The agent fires functions and confirms when it’s appropriate to move on to the next step or try again to prompt for the needed input.
Important Block Agent Components
Block Agents combine some elements you’re probably already familiar with when building other agent types (Tools, Prompts, etc.), with some powerful new components (Blocks, Turns, and Edges).
Build a Block Agent Workflow
Once you're ready to create a new Block Agent:
-
Log into your account through the Customer Portal.
-
Click the AI Studio tile to open the app.
-
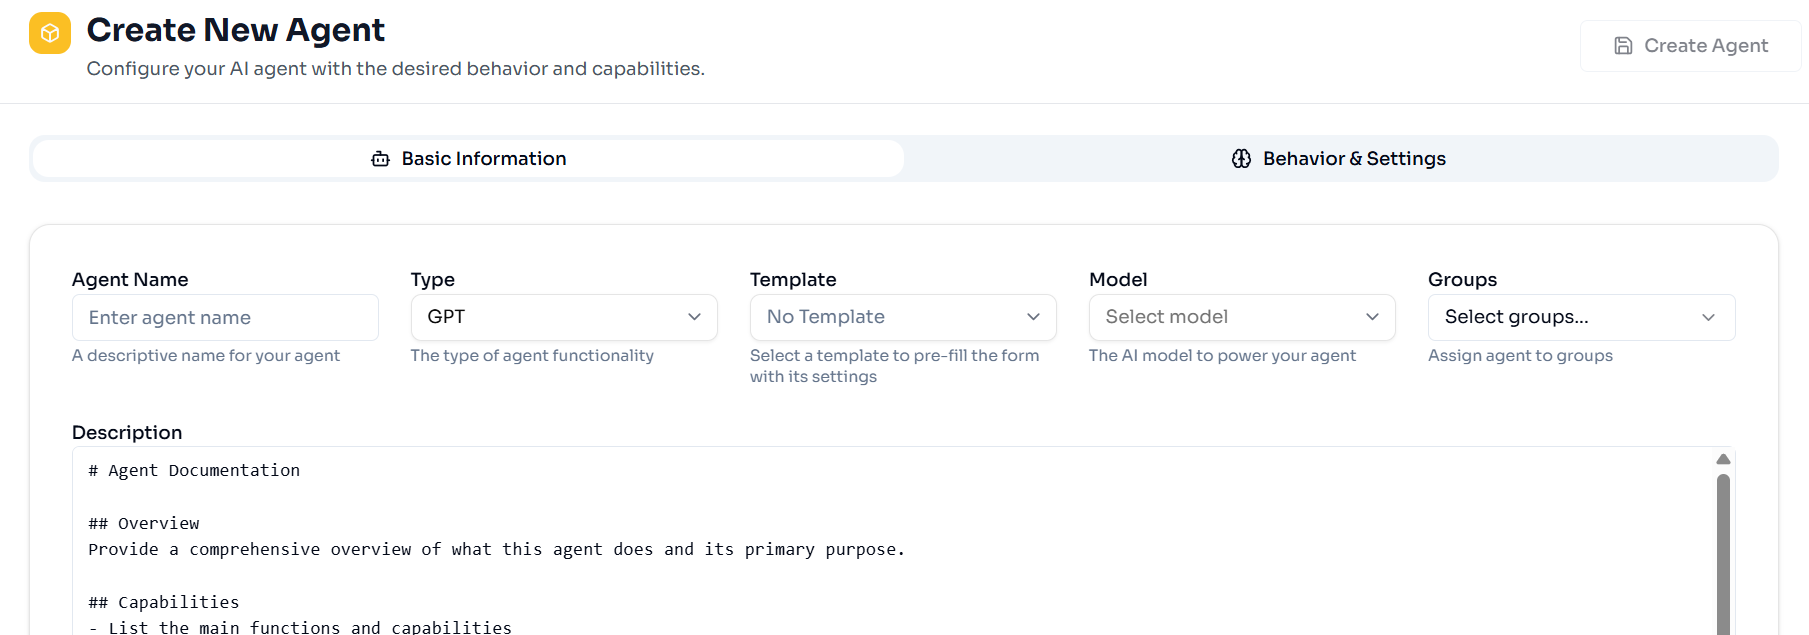
From the Agent page, click + New Agent button above the table. The Create New Agent page appears.
-
Fill in all of the details about your agent.
-
Name: Give your task a unique and descriptive name. For example, “Appointment Management Agent”.
-
Type: Select “BLOCK_AGENT” from the drop-down list.
-
Template: If you have previously created a template it will appear in the drop-down list, and you can select the appropriate one for your agent. Otherwise, you can leave this field with the default ("No Template").
-
Model: Select the AI model you want to use with your agent from the drop-down list. We recommend using “GPT4o-mini”.
-
Groups: If you previously defined AI Workflow Groups they will appear in the drop-down list, and you can select the group you want to associate this agent with. Otherwise, you can leave this field blank.
-
Description: Provide a helpful, descriptive blurb about your agent. For example, “Dr. Teeth and Associates Dentistry customer appointments agent.”
-
Click the Behavior & Settings section to view the System Prompt, Personality, and Blocks subsections.
-
System Prompt: You cannot edit this section.
-
The Block Agent System Prompt is standardized, defined and managed by the AI Team.
-
-
Personality: Instructions for the style and tone your agent should use when responding to the customer. Who is your agent? For example, you are a customer service representative for a dental office. Use a warm, cheerful, yet professional tone.
-
Optional: You can also include Argument variables that the agent should be aware of in this subsection (e.g., today’s date, hours served, etc.). These values can later be evaluated by the agent to make determinations. For example, the current date is important when scheduling the next available appointment.
-
Include a Context Argument to provide additional knowledge to your agent. For example, you could provide live knowledge of the latest appointment openings from your scheduling tool via a Context Argument from SmartFlows.
-
Arguments must be in this format “{arg_X}”, where X is your specific variable (e.g., for the current date we might include “arg_context_date_time”.
-
-
Blocks: JSON input defining all of the key Block Agent components (Blocks, Edges, Turns, and Tools).
-
Blocks: A “topic” within a conversation.
-
Blocks are focused on just one topic, and can contain multiple Turns, Edges, Tools, etc.
-
-
Turns: The individual steps that are executed in a conversation.
-
By default, a Turn doesn’t include a wait Condition, but you can include a wait Condition as appropriate for your use case.
-
-
Edges: Move the conversation on from a Turn.
-
Every Edge will have one or more Conditions associated with it that tell the model whether or not it has been satisfied. The system moves through each Edge in the order they are written, so as soon as an Edge’s Conditions are satisfied, the agent will follow that Edge (without evaluating any further Edges).
-
-
Tools: Enable your agent to perform a subsequent action based on the user’s action.
-
Multiple Tools can be triggered at a single Turn.
-
Block Agents make two parallel calls to the LLM at each Turn. One to produce an AI Response and one to trigger a Tool.
-
Note: Default text is included in all of the subsections. You cannot edit the default System Prompt text.
-
-
Click Create Agent.
We recommend reviewing all of your setting to make sure everything is correctly saved and captured. Any formatting or spelling errors, especially in the Behavior & Settings section, should be updated before you continue. For example, an error in the Blocks section could cause your agent not to execute as expected or at all.
Test Your Agent
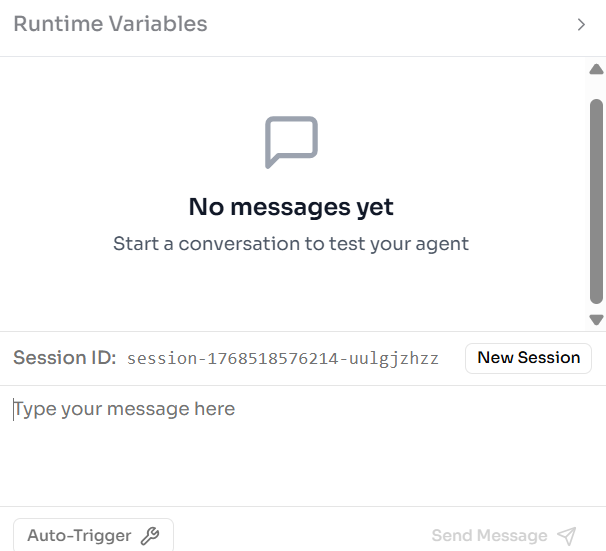
Once your agent is saved and published, we recommend testing it out to confirm it’s working as expected.
-
From the Agents page, find the tile for your agent and click the Test button (you can also click Edit, and when your agent details appear, click Live Test at the top of the page).
-
On the right side of the screen, fill in sample Runtime Variables with data relevant to your prompt.
-
Type a message in the text box and click Send Message.
-
Interact with the agent to confirm it's working as expected.
-
You can always tweak your configurations (on the left side of the screen) as needed.
-
Just remember to Save Changes if you make any updates.
-
-
Click New Session to start a new conversation.
-
-
Once you’re happy with the performance of your agent you can close the agent and Publish it.
We also recommend using the Canvas View as a visual tool to understand and test your Block Agents. You can now do a full-scale evaluation of your agent using the Tasks page. We recommend performing thorough testing using tasks before integrating your agent with SmartFlows. Once all of the task metrics meet your use case specific thresholds, you can move on to incorporating your agent into a flow.
Tips and Best Practices
-
We recommend ensuring all of your component names and ids are unique.
-
It can get confusing if multiple components have the same name (e.g., if you have a “block_id”, “name”, and “function” all labeled “Caller_Authentication”). That might cause unexpected issues or difficulty troubleshooting later.
-
-
Focus each Block on a specific topic.
-
Clearly define your Turn Conditions to avoid unexpected behaviors.
-
Connect your Turns in a logical sequence.
-
Remember to consider error handling and transitions between Blocks and Turns.
-
Be aware, if multiple Edges are true, the agent will follow the first true path. Edges are evaluated from top to bottom as defined.