Managing Lists in the IntelePeer Customer Portal
This guide describes List Management features found within the IntelePeer Customer Portal. From the List Management page you can:
Overview
List Management is a database management system used to create and manage records for use with SmartEngage and SmartFlows. Lists are a convenient way to group records and retain important data elements.
Your lists could be used to:
-
Send different promos to new customers vs. long-time customers (via SmartEngage campaign)
-
Target a specific group for notification based on geographic location (e.g., only team members in Denver, not California, are notified by HR that the office will be closed following a blizzard, via SmartEngage campaign)
-
Automatically add new subscribers to SMS notifications (via the SmartFlows Add List Item action)
-
Automatically unenroll subscribers from promo campaigns (via the SmartFlows Delete List Item action)
-
Automatically look up or update a subscriber’s preferred phone number for notifications (via the SmartFlows List Lookup or Update List Item action)
List Management
The Lists Management application takes you to the List Management page. This is where you can manage existing SmartEngage and SmartFlows lists in your account and add new ones.
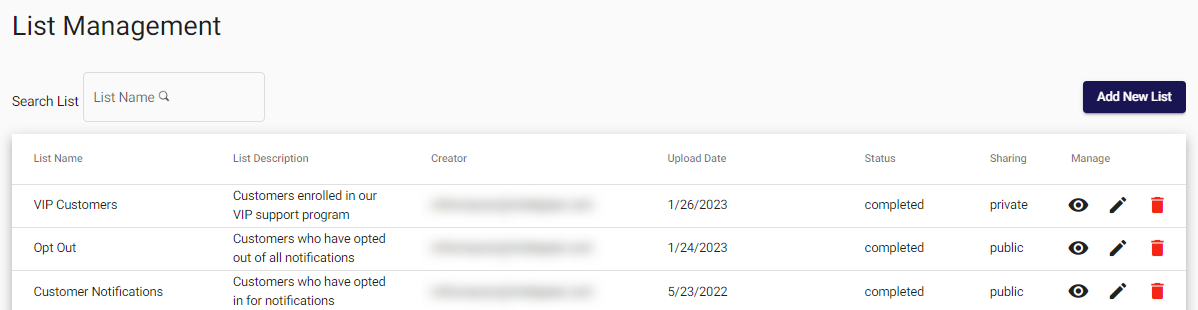
Existing lists, added by you or publicly shared by anyone on your account, are included in the table. You can edit or delete lists through the Manage column.
You can also automate managing your lists through our List Management APIs.
Add a New List
Before you add a new list, make sure you have a CSV file handy with your list items, appropriate method(s) of contact, and clear headers with no spaces (e.g., “firstname”).
Note: CSV files exceeding 6 MB cannot be added to a list.
-
Click Add New List. The Create a List page opens.
-
Give your list a unique name and description.
-
Click Browse to navigate to and open your CSV file. After you add your file, you’ll notice the List Preview section updates at the bottom of the page. This shows the headers pulled in from your file and the first row of data.
Note: If your list doesn’t appear correctly, you can update your CSV file as needed, save your changes, and reselect the file through the Browse button.
-
Click on the Sharing field and select if you would like your list to be private (only you can see and use the list) or public (anyone on your account can see and use the list).
-
Click Save, then OK on the success message.
-
You'll be automatically returned to the List Management page. Your new list appears in the table.
Note: The table is organized with lists in order from newest to oldest.
-
The Status column updates automatically to reflect the state of your list. If your CSV file is very large it may take some time for the file to be processed and in "completed" status. List statuses include: created, processing, completed, and failed.
Update a List
Click the modify icon in the Manage column to update the content of your list. You can append your list, add a new field, add a new record, delete a record, or delete all records on the Update List page.
Append a List
Note: The CSV file you are using to append the list must match the layout of your current list (i.e., same column headers).
-
Click the modify icon to the right of the list you want to add a record to. The list modification page opens.
-
Click the Select Action drop-down menu, then Append a List.
-
Click Browse to navigate to and open your CSV file. After you add your file, you’ll notice the List Preview section updates at the bottom of the page.
-
Click Save, Yes, append on the confirmation message, and OK on the success message. Your new records appear in the table.
Add a New Field
-
Click the modify icon to the right of the list you want to add a record to. The list modification page opens.
-
Click the Select Action drop-down menu, then Add a New Field.
-
Add a unique name to the New Field text box.
-
Click Update, Yes, Add on the confirmation message, and OK on the success message. Your new field appears in the table.
Add a New List Record
-
Click the modify icon to the right of the list you want to add a record to. The list modification page opens.
-
Click the Select Action drop-down menu, then Add New Record.
-
A form opens with fields for each of your list headers. Add in the record details.
-
Click Add New Record to create additional rows, as needed.
-
Click Update, then OK on the success message. Your new record(s) appear in the table.
Delete a List Record
Note: If you delete a list record, it will be gone forever. Please triple check before deleting a list item.
-
Click the modify icon to the right of the list you want to delete a record from. The list modification page opens.
-
Click the delete icon to the right of the record you want to remove.
-
Click Yes, Delete on the pop-up warning message, then OK on the success message. Your record is removed from the table.
Delete All List Records
-
Click the modify icon to the right of the list you want to add a record to. The list modification page opens.
-
Click the Select Action drop-down menu, then Delete All Records.
-
Click Yes, delete on the warning message, then OK on the success message. All records are removed and the table is empty.
Hide List Data
If your list includes sensitive information (e.g., credit card numbers, PII, etc.), you may want to obfuscate one or more fields.
Note: Only the creator of the list can obfuscate, or remove obfuscation from, fields. Obfuscation does not impact SmartFlows or API functionality linked to your list (e.g., if your flow includes the List Lookup action to pull data from your list into a flow, even if the field is obfuscated in List Management, it will not be obfuscated in your flow).
To obfuscate list fields:
-
Click the edit icon to the right of the list you want to update. The list modification page opens.
-
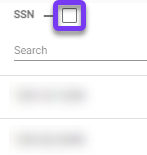
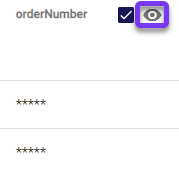
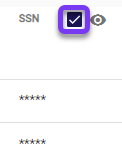
A check box appears to the right of each list field. Click the check box next to the field you want to obfuscate.
-
A confirmation pop-up appears. Click Yes, obfuscate '{fieldname}' field.
-
Click Ok on the success pop-up message. The field data is now replaced with asterisks.
-
Repeat steps 2-4 for any other fields you want to obfuscate.
Once your field is obfuscated, you can click the view icon next to the check box to temporarily see the obfuscated data.
Note: This icon is only available for the creator of the list.
To remove obfuscation from list fields:
-
Click the edit icon to right of the list you want to update. The list modification page opens.
-
Click the check box to the right of the obfuscated field.
-
A confirmation pop-up appears. Click Yes, unofuscate '{fieldname}' field.
-
Click Ok on the success pop-up message. The field data is no longer obfuscated.
-
Repeat steps 2-4 for any other fields you want to remove obfuscation from.
Delete a List
Note: If you delete a list, it will be gone forever. Please triple check before deleting a list.
You cannot delete a list assigned to an active SmartEngage campaign. Please deactivate the campaign, or remove the list you want to delete and assign a different list to the campaign before deleting a list assigned to an active campaign.
If you delete a list referenced in a List Action within SmartFlows, the flow will not function correctly (e.g., the flow will not be able to match the list details). Please ensure the flow configuration is updated to match another list before deleting a list associated with flow.
-
Click the red delete icon in the Manage column of the list you want to delete.
-
Click Yes, Delete on the pop-up warning message, then OK on the success message. Your list is removed from the table.