Using the 10DLC Campaign Registration Form
To create a new campaign, you must complete and submit the Campaign Registration form. You need both a registered campaign and a registered brand to send messages. Otherwise, your messages are rejected.
Note: A campaign requires a brand association. The brand must be Registered to be available to select the UI. If there are no available registered brands, campaign registration can’t occur. If there are no registered brands, you get a pop-up telling you to create and register a brand first.
To access the form:
-
Log into the Customer Portal.
-
On the Home page, in the left column, click Compliance > Messaging.
-
On the Messaging page, click the Campaigns tab.
-
Above the My Campaigns table, click New Campaign. The form appears.
For more information, check out Why You Need to Know About 10DLC and Toll-Free Verified Numbers.

Campaign Details
| Field | Description |
|---|---|
| Campaign Name | Create a unique, easily identifiable name for your registered campaign |
| Estimated Monthly Volume |
Enter the number of messages you are sending per month |
|
MMS Required |
Identify if the campaign includes MMS messages. If so, select Yes. You are required to submit sample media files in the Use Case Details section for MMS campaigns. Media files are required if MMS is selected in campaign details—at least 2 files but not more than 5. Color indicates they have been uploaded successfully |
|
Age Gated Material |
Signify if the campaign includes age-gated content as defined by the carrier and CTIA guidelines; for more details, check out Age Verification System |
|
Direct Lending |
Identify if the campaign includes content related to direct lending or other loan arrangements |
|
Customer Care Email |
Enter the email address customers can use to contact your customer support personnel |
|
Associated Brand |
Identify the brand that is associated with this campaign |
|
Low Volume |
Identify if your campaign is low daily volume and non-time sensitive messages |
|
Pooling Required |
Required if you need more than 49 numbers assigned to the same campaign; pooling requests incur an additional one-time fee; for more information, check out the Ancillary Fees page |
|
Embedded Links |
Identifies whether the campaign sends any embedded links; URL shortening is prohibited |
|
Embedded Phone |
Identifies whether any embedded phone numbers are used in the campaign, except for the required HELP contact phone number |
|
Customer Care Phone |
Enter the phone number customers can use to contact your customer support personnel Must be in E.164 format (e.g., +11234567890) |
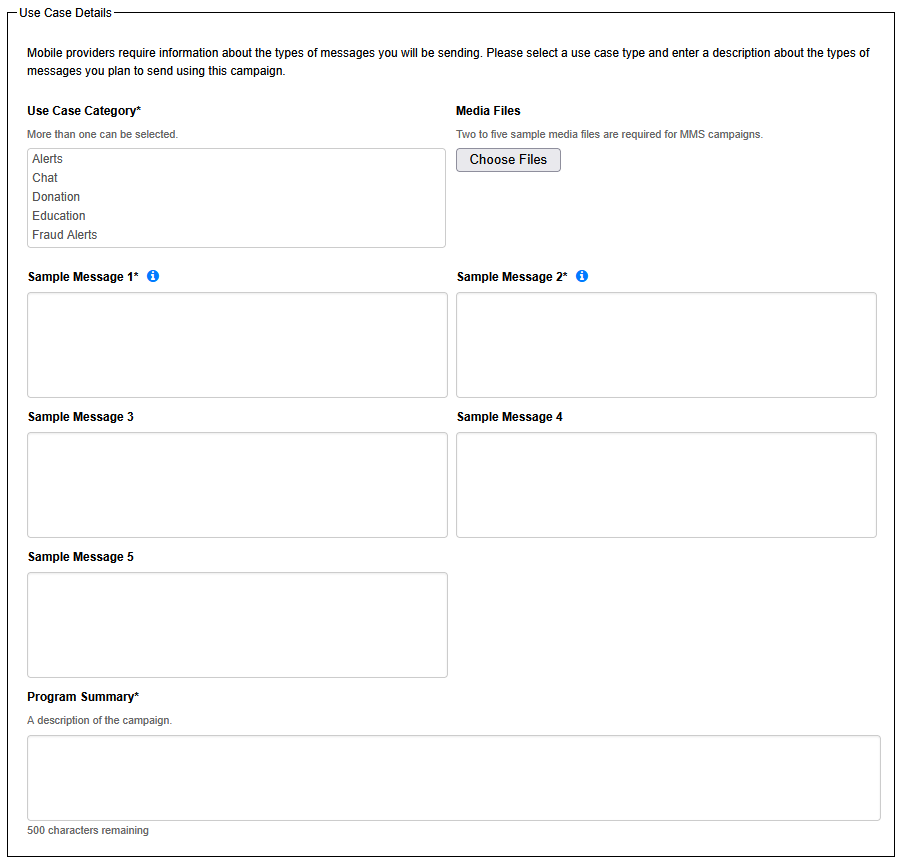
Use Case Details
Mobile providers require information about the types of messages you are sending. Use this section to select a use case type and enter a description about the types of messages you plan to send for the campaign.
| Field | Description |
|---|---|
| Use Case Category | More than one can be selected; for more information, check out Why You Need to Know About 10DLC and Toll-Free Verified Numbers |
| Sample Messages |
An example of messages associated with the campaign |
|
Media Files |
Identify any multimedia files associated with the campaign |
|
Program Summary |
An overview of what the campaign entails |
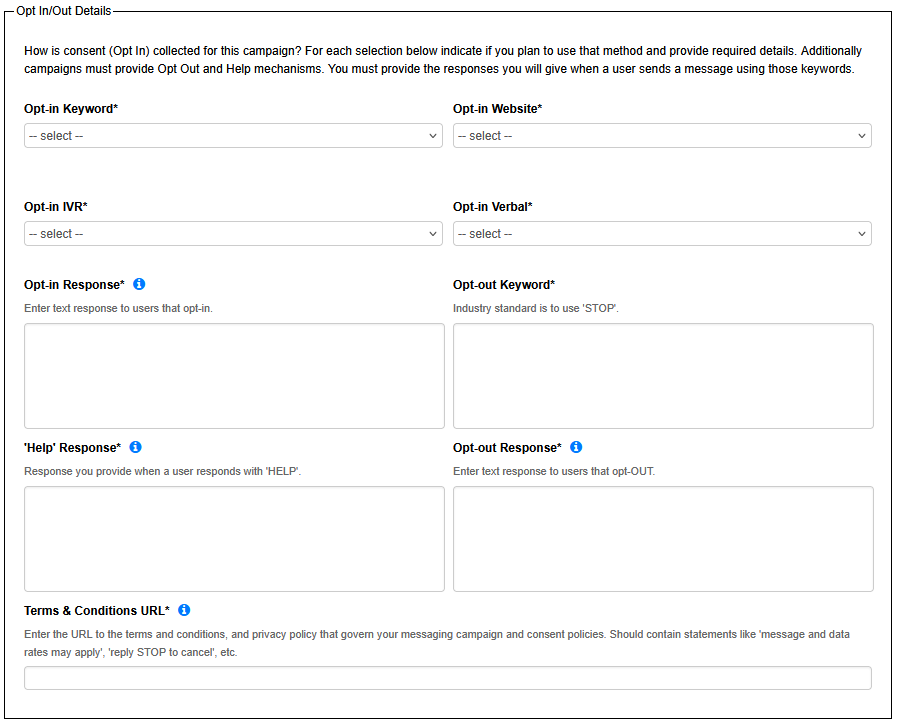
Opt-In / -Out Details
Use this section to provide information on how consent (opt-in) is to be collected for the campaign. For each selection, indicate if you plan to use that method and provide required details. Campaigns must provide opt-out and Help mechanisms and provide the responses when a customer sends a message using those keywords.
| Field | Description |
|---|---|
| Opt-in Keyword | Enter the keywords used by your customer to opt-in to your messages; you can use multiple keywords |
| Keyword Call to Action |
The message sent that asks your customer to subscribe (appears when Opt-in Keyword is "Yes") |
|
Opt-in IVR |
Interactive voice response (IVR) used when customer subscribes |
|
IVR Call to Action |
Audible message that asks your customer to subscribe (appears when Opt-in IVR is "Yes") |
|
Opt-in Response |
The text response to customers who opt-in |
|
Help Response |
The response you provide when a customer responds with HELP |
|
Opt-in Website |
The website URL used for opt-in |
|
Opt-in Screenshot |
The screenshot must show the field where the customer enters their phone number |
|
Website Call to Action |
The message that directs them to the website where they can subscribe (appears when Opt-in Website is "Yes") |
|
Opt-in Verbal |
Select Yes if a verbal response is presented to the customer to opt-in |
|
Verbal Call to Action |
The audible message that asks the customer to subscribe (appears when Opt-in Verbal is "Yes") |
|
Opt-out Keyword |
The keyword used to opt-out; the industry standard is to use STOP |
|
Opt-out Response |
The text response to customers who opt-out |
|
Terms & Conditions URL |
The URL to the terms and condition statement and privacy policy that governs your messaging campaign; common policies should contain statements like “Message and data rates may apply,” and “Reply STOP to cancel,” as well as others |
Saving Your Campaign Form
The campaign can be saved in draft format if you are not ready to submit. Just click Save, then OK on the saved successfully pop-up, and you can reopen the form again later.
Submitting Your Campaign Form
Once you are ready to submit your form, click Next – Choose Numbers to select the numbers you want to associate with this campaign.
Click the Add Search String button to filter the Matching Numbers table by available data fields (e.g., Telephone Number, Order ID, Rate Center,etc.). Partial matching is also available to help with filtering.
Important: If you require more than 49 numbers attached to a single campaign, you incur a pooling fee. For more information, check out the Ancillary Fees page. After submitting a new campaign, you can add or remove numbers later through the customer packages view.
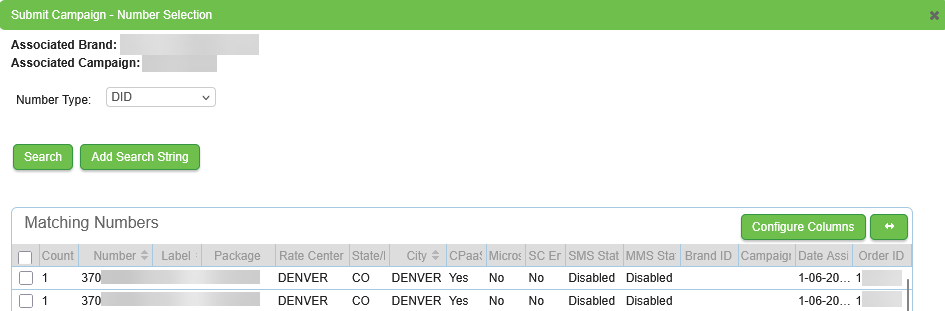
Once you select your number(s), click Submit Activation Order to start the campaign registration process. Registration is required for both brands and campaigns before you start sending out messages. Without the registration, your messages will be rejected.
Your campaign will be in a Pending Registration status until the mobile carriers approve or deny the campaign.
Pooling
When you register your campaign, the Pooling Required field indicates if your campaign will need more than 49 numbers. When you use outbound SMS / MMS campaigns, you often send messages to many recipients. Number pooling involves purchasing and allocating multiple sending numbers to a pool or group of more than 49 numbers. When sending a message to a recipient, a number is then selected from the pool and assigned to a recipient. Subsequent messages sent to the same recipient are then bound to that specific number.
Note: The use of pooling incurs additional fees. For more information, check out the Ancillary Fees page.
Form Errors
When you submit your form, you may receive an error message if you:
-
Haven’t created any campaigns yet
-
Attempted to add more numbers to a campaign than allowed; the limit is 49 numbers unless you purchase pooling
-
Didn’t include some of the required field information
-
Formatted the information incorrectly
-
Didn’t include any required attachments
If you receive an error message, review the form. View any highlighted fields; correct the form and resubmit.
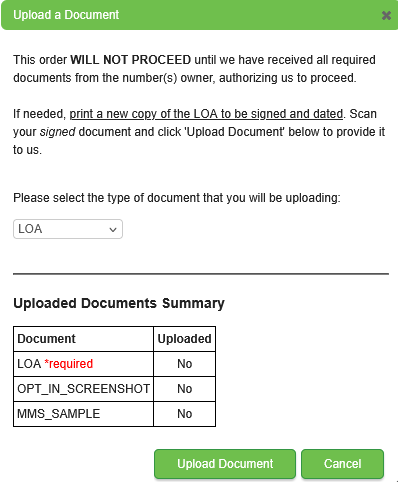
Adding an LOA
For you to enable a messaging campaign, you are required to attach a Letter of Authorization / Agency (LOA).
Note: In addition to the LOA, campaign creation requires an opt-in screenshot. For MMS campaigns, MMS sample documents are required. If any of the sample documents are rejected during review by IntelePeer, you must resubmit your documents.
-
On the Customer Portal, Home page, click View Orders > Messaging tab.

-
In the table, find the order that requires the LOA and/or additional documents. You can filter by Order ID, Brand ID, Campaign ID, Order Type, and Order Status.
-
In the Actions column on the right side of the table, select Upload Document from the drop-down menu, and click GO. The Upload a Document pop-up appears.
-
Review the Upload Documents Summary table to determine what documents are required.
-
From the drop-down menu, click the document you want to upload. Click Upload Document and locate the associated document from your device.
-
If you have more than one document to upload, return to the table, find the order and repeat the previous steps for each additional document that requires uploading.
Note: Once the request is submitted, a DocuSign request is sent to the authorized signer’s email address. As soon as the system receives the signature, the LOA process is complete for the order.
-
You can view the status of the LOA on this page. The statuses include uploading the form, rejected, waiting for acceptance, and approved. Visit this page as often as needed to keep informed on the LOA status.
Order Status Notification
You can set up a notification when the order status changes. Do the following:
Note: This action requires administrator permissions.
-
On the Customer Portal Home page, in the left column, click User Management.
-
On the Users tab, locate the person you want to receive notifications.
-
In the Actions column, select User: Edit, and click GO.
-
On the User / Contact Details page, in the Contact or Notify About section on the right, click Order Status, and click Save.
The user will then be contacted via email when there is a change to order status.