Using the 10DLC Brand Registration Form
To create a new brand, you must complete and submit the Brand Registration form. You can’t submit a campaign unless you have first created and registered at least one brand.
Note: A campaign requires a brand association. The brand must be Registered to be available to select the UI. If there are no available brands, campaign registration can’t occur. You receive a pop-up telling you to create and register a brand first.
To access the form:
-
Log into the Customer Portal.
-
On the Home page, in the left column, click Compliance >Messaging.
-
On the Messaging page, click the Brands tab. Above the My Brand table, click New Brand. The form appears. An asterisk (*) identifies the required fields.
Note: All form fields are required, except for the Stock Symbol and Stock Exchange fields, which are conditional; they are required if your Legal Entity Type is Publicly Traded Company. Alternate Business ID Type and Business ID are also optional; however, if you select an Alternate Business ID Type, then the Business ID is also required.
For more information, check out Why You Need to Know About 10DLC and Toll-Free Verified Numbers.
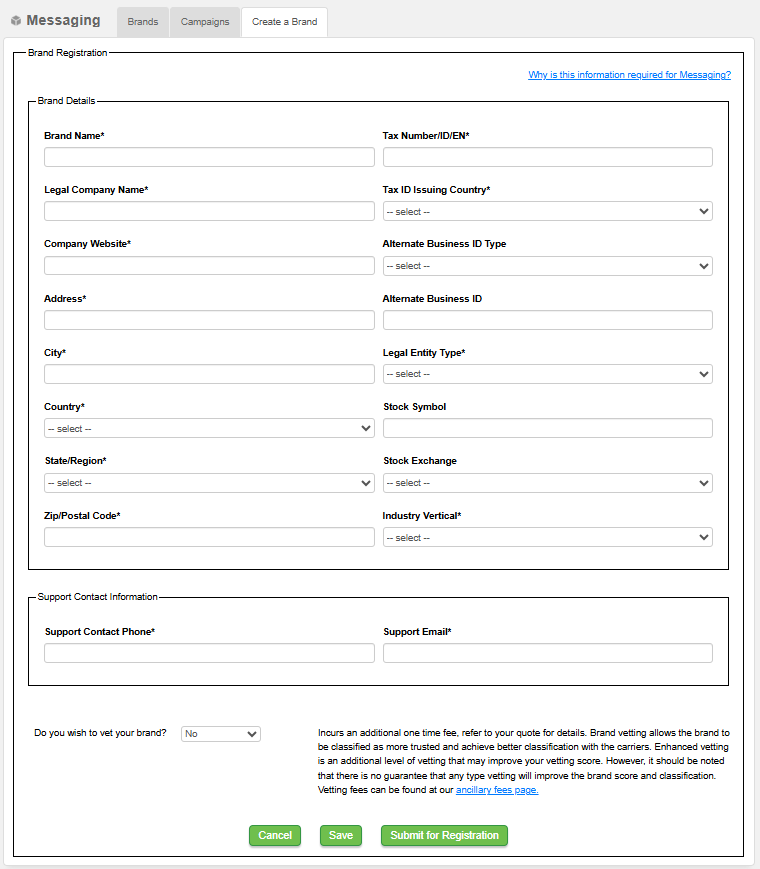
Brand Details
| Field | Description |
|---|---|
| Brand Name | Used to identify your registered brand, especially if you have more than one |
| Legal Company Name |
Name of the company that is sending the messaging; this can’t be a third party or a reseller |
|
Company Website |
The URL for your company website |
|
Address |
Address of the brand |
|
City |
The city you identify as the brand location |
|
Country |
The Country drop-down shows a full list of country names |
|
State / Region |
State or province; for the United States, use 2-character codes; for example, The State / Region drop-down shows the full state names |
|
Zip Code / Postal Code |
Code where the brand is located; for US or Canada |
|
Tax Number / ID / EIN |
The tax identifier (EIN) for the brand |
|
Tax ID Issuing Country |
Country that issued the tax ID number |
|
Alternate Business ID Type |
Choices are DUNS, GIIN, or LEI; if you make a choice for this field, the Alternate Business ID is also required |
|
Alternate Business ID |
Conditional field; required if you select a choice from the Alternate Business ID Type field |
|
Legal Entity Type |
The legal structure or form a company takes, such as a sole proprietorship, partnership, corporation, or LLC, which determines its rights, liabilities, and taxation |
|
Stock Symbol |
Conditional field; required if your Legal Entity Type is Publicly Traded Company |
|
Stock Exchange |
Conditional field; required if your Legal Entity Type is Publicly Traded Company |
|
Industry Vertical |
Select the appropriate vertical that fits your company |
Support Contact Information
| Field | Description |
|---|---|
| Support Contact Phone |
Person or department that is responsible for providing brand information Must be in E.164 format (e.g., +11234567890) |
| Support Email |
The business email address to contact about brand compliance issues Must be in well-formed email address format |
Vetting Your Brand
If you want your brand to be vetted, you can choose either standard or enhanced vetting. Brand vetting allows the brand to be classified as more trusted and achieve better classification with the carriers.
Enhanced vetting is an additional level of vetting that may improve your vetting score. However, there is no guarantee any type of vetting will improve the brand score and classification.
Important: Vetting incurs an additional one-time fee. For more details, check out the Ancillary Fees page.
To set up brand vetting:
-
From the Do you wish to vet your brand? drop-down at the bottom of the Brand Registration form.

-
This field is set to no vetting by default.
-
Select Standard or Enhanced to vet your brand.
-
With Standard or Enhanced vetting selected, additional fees are incurred.
Note: In the table back on the Brands tab, the vetting-related columns are empty while the brand is pending registration even if the brand was created with a vetting type selected. This occurs because vetting doesn’t happen until the brand has completed its registration.
Saving and Submitting for Brand Registration
The Brand form can be saved in draft form without all required information filled out. At the bottom of the page, click Save. You can then reopen and edit later. If your form is saved successfully, a pop-up confirmation appears.
Once you have successfully completed the required fields, you can submit the brand for registration. Registration is required for both brands and campaigns before you start sending out messages. Without the registration, your messages will be rejected.
To submit your brand registration form:
-
At the bottom of the page, click Submit for Registration. If the brand form is successfully submitted, a confirmation pop-up appears.
You should expect the brand to be in “Pending Registration” status until approved, and then switch to a “Registered” status. “Submitted” status indicates that the form was completed and submitted and the brand must be created before moving forward.
Form Errors
When you submit your form, you may receive an error message if you:
-
All the required fields aren't completed
-
Your information isn't formatted correctly
If you receive an error message, review the form. View any highlighted fields, correct the form, and resubmit.