How to Schedule a Campaign
This guide describes how to set up a schedule for your SmartEngage Campaign. Learn more about:
Overview
SmartEngage helps you reach your target audience with customizable campaigns. While some campaigns might be sent on a one-time basis, if you want your campaign to run frequently or on a recurring basis, you can build a schedule for the campaign. A scheduled campaign runs automatically, based on fully customizable criteria, saving time and establishing consistent outreach to your audience.
Building a Custom Campaign Schedule
When filling out the New Campaign form you have the option to run your campaign manually or automatically according to a set schedule.

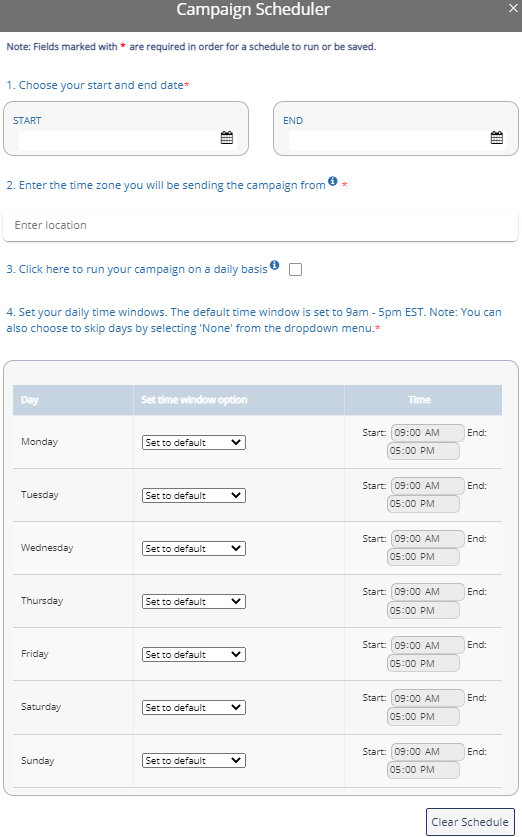
Click the second option and Schedule Builder to launch the Campaign Scheduler. Here you can customize all the details for when your campaign will be sent out:
-
Choose your start and end date.
-
Start: This is the day your schedule will go into effect. This is not necessarily the first day the campaign will be sent out because it will depend on the customizations below (e.g., you could select the start date of 7/1 but if that is a Friday and you only want your campaign to run on Tuesdays and Thursday, the campaign won’t be sent out for the first time until the first Tuesday, 7/5).
-
End: This is the day your schedule will no longer be valid. Similar to the Start date, this is not necessarily the last day your campaign will be sent out.
Note: You can’t select a Start or End date prior to the current date. Once you select the Start date, you can’t select an End date prior to the Start (e.g., if your schedule begins on 7/4 you cannot select a 7/3 End date).
-
-
Enter your time zone.
-
This will inform the time periods for your schedule, customized in the next step, and ensures your campaign is sent according to your local time (e.g., if you and your customers live in Hawaii and you set your campaign to be sent out at 10 AM, you wouldn’t want customers to receive your campaign at 10 AM EST. That’s 4 AM in Hawaii!)
-
Start typing your time zone in the text box and suggestions will automatically appear.
Note: You can select your time zone here, but you can also elect to have your campaign sent to recipients based on their time zone when you’re setting up your list. Click the Split Contacts by Timezone check box back in section four of the New Campaign form.
-
-
Click the check box to run your campaign daily.
Note: If you don’t select this check box, your campaign will only run once on the Start date.
-
Choose your time windows.
-
The time window Start is when the campaign will begin running and the End time is when the campaign will stop running. This doesn’t mean, for example, that the same SMS will be sent to the same recipients all day if your window is from 9:00 AM to 5:00 PM. It means your campaign will attempt to send the SMS starting at 9:00 AM and will keep trying until 5:00 PM. If the SMS is successfully sent to your list recipients by 9:01 AM, no additional messages will be sent out.
-
By default this section is set to the following schedule: Your campaign will run every day of the week, from 9:00 AM to 5:00 PM. But your schedule is completely customizable.
-
Set time window option:
-
Set to default: The campaign will run on the specified day from 9:00 AM to 5:00 PM.
-
Set time windows: The Time fields on the right are now editable. Select the time frame for your campaign to Start and End on the specified day (e.g., if customers are more available in the afternoon you could set your Start to 11 AM and End to 2 PM).
-
None: The campaign will not run on the specified day (e.g., if you don’t want your campaign to run on the weekends select “None” for Saturday and Sunday).
-
-
-
Click Save Schedule.
Note: If you ever want to reset your schedule, click Clear Schedule. This will erase all of your previous selections on the Campaign Scheduler pop-up.
One you publish your campaign the status on the Campaigns page will update to “Scheduled” and your campaign will automatically run according to your specifications.

On the Campaigns page you can click the Pause or Stop button at any time to prevent your campaign from running according to the next scheduled window. Once you are ready to continue with a paused campaign, click the Resume Campaign button.
Sample Schedule
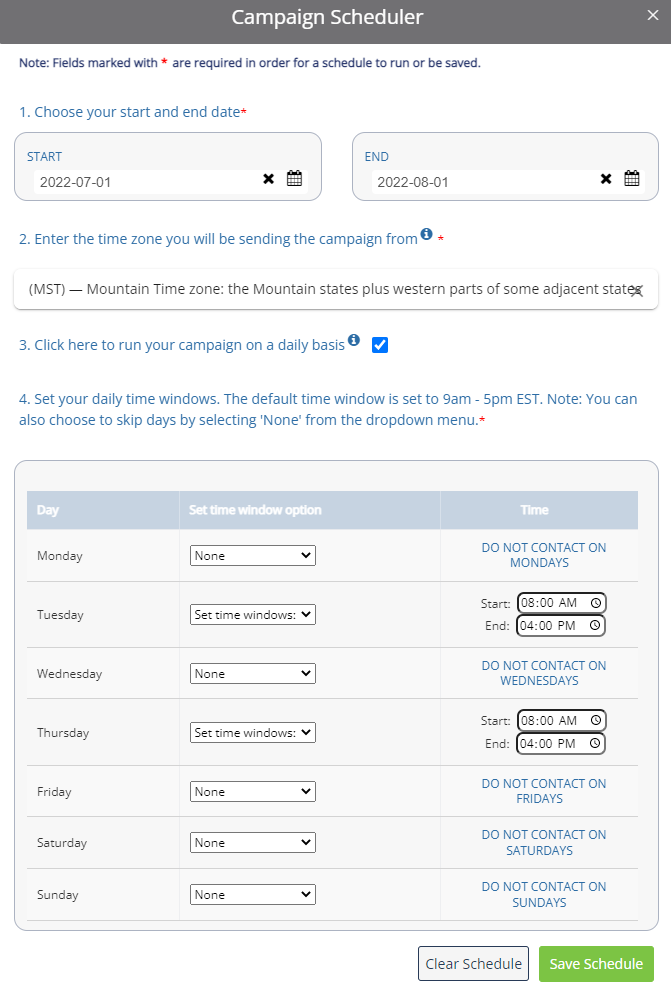
Say you would like to send reminder notifications to employees about a new required training. Employees have a month to complete the training and you want to send out reminders twice a week during normal working hours. This is one way you could schedule your campaign:
-
Open the Campaign Scheduler pop-up.
-
Employees must complete the required training in July, so the campaign will Start on July 1st and End on August 1st.
-
The company is based in Denver, so the best time zone is Mountain Standard Time (MST).
-
The campaign will be sent out multiple times, so click the “run your campaign on a daily basis” check box.
-
Now it's time to customize the time windows:
-
Reminders will be sent out on Tuesday and Thursdays, so for every other day, select “None” in the Set time window option column.
-
In the Tuesday row, select “Set time windows” in the Set time window option column. The Start and End times are now editable. Our employees follow an 8:00 AM to 4:00 PM schedule so update the Start to 8:00 AM and update the End to 4:00 PM.
-
Repeat for the Thursday row.
-
-
Click Save Schedule. Click OK on the reminder message that appears letting you know the schedule will not begin until the campaign is published.
Your Campaign Schedule would look like this:
Tips
-
Your campaign will not start automatically running according to your schedule until you publish the campaign.
-
If you want to test out your campaign and schedule before contacting actual customers, assign a test list to your campaign with just one phone number that you own (e.g., your cell phone). Save and publish your campaign, and you should receive a message according to the schedule. You can experience the campaign yourself and tweak your message or schedule as needed. Once you’re happy with the campaign experience, remember to update your list, save your changes, and publish your campaign!
For more detailed information about using SmartEngage, check out: