Managing Bulk Actions
The IntelePeer Customer Portal provides you with the ability to simultaneously add information and make changes to a large number of telephone (DIDs), and Static and Dynamic 911 numbers you currently have in your inventory. The bulk inventory action tool can be used to make a single or multiple changes to many telephone numbers with one file upload. Single changes can be made by uploading a file with one column of telephone numbers. For multiple changes, you must upload a multi-column file. Changes can be made, for example, to labels, caller ID, CNAM registration, and Static and Dynamic 911 options.
Note: These actions can only be done on US Domestic Numbers, and Static and Dynamic 911 orders.
To access the bulk action tool:
-
Open the Customer Portal.
-
From the top of the page (or the three vertical lines in the top left corner of the page, depending on the size of your screen) select My Numbers then Inventory.
-
From the Inventory page, click the US Domestic Numbers tab. At the top of the tab, you can see the drag-and-drop section. This is where you can upload the .csv or .txt (comma separated) or the template file with a list of the telephone numbers you want to make changes to.
-
You can also download the entire inventory list by clicking Download CSV. Remember this download includes all numbers and complete information, and includes all status types, not just valid numbers.
-
Once the number order is submitted, you can view it on the Home > View Orders page.
File Preparation
To begin using the bulk inventory actions tool:
-
In the drag-and-drop section at the top of the page, click Download Template. Once you select the actions you want to take and confirm and download the .csv template, the headings are pre-populated.
-
You can also create your own .csv file or .txt (comma separated) file with no headers. The system rejects any other file types or files with headers. Once you upload the file, you have options to select headers.
Important: Both the single and multi-column files and the downloaded template must contain valid inventoried, ten-digit telephone numbers (DIDs) in the first column.
-
For multi-column files, you can include any or all of the following data fields along with the telephone numbers (required), totaling ten columns: Telephone Number, Label, Caller ID, CNAM Registration, Location Name, Address, Suite/Apt, City, State, and ZIP/Postal. If you go over ten columns, you receive an error message.
Note: Be aware the data limit may be reached when working with large amounts of telephone numbers. Orders that have not errored will get added to an order batch of up to 250 numbers.
Setting Up Actions
Depending on what action you want to apply to the numbers, you have the following options:
-
If you upload a file with one column of 10-digit numbers, then you can perform a single action against all of the telephone numbers.
-
If you upload a file with multiple columns, you can perform multiple, unique actions on the telephone numbers included.
Using the Bulk Action Template
The Bulk Action template provides pre-populated column headings that match the actions you want to take for your numbers.
-
From the top of the page (or the three vertical lines in the top left corner of the page, depending on the size of your screen) select My Numbers then Inventory.
-
Click the US Domestic Numbers tab.
-
In the drag-and-drop section at the top of the page, click Download Template.
-
In the Select Template Operations popup, select:
-
Single Actions (All other choices are disabled when this is selected)
-
CNAM Registration
-
Caller ID
-
Label
-
E911 Static Add
-
E911 Static Change
-
E911 Dynamic Add
-
E911 Dynamic Change
-
Note: You can select a combination of CNAM Registration, Caller ID, Label, and E911.
-
Click Confirm Options.
Note: Once clicked, Confirm Options changes to Download CSV.
-
Click Download CSV.
-
Open the .csv file. Add the relevant information to each column and save the file.
Note: For help in formatting each column, in the drag-and-drop section at the top of the page, click the What Is This link.
-
Upload the file into the drag-and-drop section, and follow the prompts to place your order.
Note: If there is an error when uploading your number information, check out the Invalid Number Selection section.
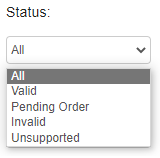
Number Status
Once you upload your .csv file, a pop-up displays the list of numbers you uploaded showing the Number Inventory Status in the right column. The statuses are:
-
Valid
-
Pending Order
-
Invalid
-
Unsupported
Note: The telephone numbers must have a status of Valid to make additions or changes.
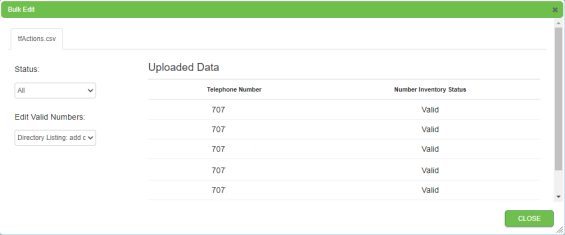
Use the Status drop-down to filter the numbers. This is useful to identify any numbers that you won't be able to edit.
Actions for a One-Column File
Once you have uploaded your single-column .csv file and identified the valid telephone numbers, use the Edit Valid Numbers drop-down to apply the same action to all numbers. The actions include:
-
Move to Another Package: a pop-up supplies a list of packages you can move all numbers to.
-
Label: Add or Change: add a new label or change a current label for all numbers; the label can be up to 45 characters long and cannot include a comma or question mark.
-
Disconnect Number: remove the numbers from your inventory; select a reason from the menu or include your own.
- Directory Listing: Add or Change: enter the personal or business information for all numbers; a one-time setup fee and recurring fees apply.
-
E911 Service Add or Remove: add or remove E911 service for the number or numbers.
Actions for a Multi-Column File
Multi-column .csv files are handled differently from single column .csv files. The column headings designate the changes you want to make, so set your file up depending on the action you want to accomplish.
Note: When using the template provided on the page, the headings are pre-populated.
The first column must contain the ten-digit telephone numbers and must be given the Telephone Number header. All other fields can be placed in any order you want, because you can select the headers once the file is uploaded successfully. If you use the template, the headings are already set for each column.
The column headings you can select are:
- Label: you can enter labels in any cell corresponding to the desired numbers row. Mapping Label to a blank column for a number removes the label. The label can be up to 45 characters long and cannot include a comma or question mark.
Note: If you want to continue to keep a current label, because leaving a label cell blank removes the label from the number, enter the current label in the cell to leave the label as-is.
-
Caller ID: to turn Caller ID on or off for a number, enter true or false in any cell corresponding to the desired numbers row. To ignore this option for a number, leave the field blank.
Note: Leaving this cell blank does not change the status.
-
CNAM Registration: you can enter the CNAM registration in any cell corresponding to the desired numbers row.
Note: Mapping CNAM to a blank cell for a number removes CNAM.
911 Options: If you are adding or making changes to Static 911 telephone numbers; all the fields under 911 Location Options are required, except for Suite/Apt. When adding Dynamic 911 numbers, all the fields required for Static 911 are also required. In addition, the Caller Name and 911 Location Options fields are also required. The Identifiers, Suite/Apt, and Callback Numbers fields are optional.
Note: The system validates the address you provide; if incorrect, make the appropriate changes in your .csv file, remove the rows for those numbers that had validated addresses, and upload your file again.
-
Location Name: required
-
Address: required
-
Suite/Apt: optional
-
City: required
-
State: required
-
ZIP/Postal: required
Once the file is successfully uploaded, a pop-up appears with a Select Column Headers menu above each column.
Note: With multi-column files, the telephone numbers must have a status of Valid to make additions or changes.
In this pop-up, do the following:
Note: If, in your .csv file, you have a blank column between two columns containing data, the blank columns appear in the Uploaded Data pop-up. Blank columns still require you to choose a heading; however, the system ignores these columns except in the cases of Labels and CNAM. For more information, see the previous descriptions of these two column headings.
-
You can't duplicate headers. If you do, you receive an error message.
-
The system ignores empty cells, except in the cases of Labels and CNAM Registration. Populate those cells that are necessary for the action you want to perform. You can then continue to follow the prompts until you have submitted your order.
-
If information is missing from the file that you need to perform an action, an error message appears.
Actions for 911 Numbers
-
If your file includes valid Static or Dynamic 911 numbers, once the file headers are confirmed, you can select the action to apply to the numbers.
Note: When using the single column .csv file, the same action must be applied to all 911 numbers, either E911 Service: Change or E911 Remove: Remove.
-
To perform 911 actions using a multi-column file, you must include the following required fields: Location Name, Address, City, State, and ZIP/Postal. Suite/Apt is optional and can be left blank. In addition, for Dynamic 911 numbers, the Caller Name and 911 Location Options fields are also required. The Identifiers and Callback Numbers fields are optional.
-
If the validation process determines that any addresses are incorrect, the upload fails. In a pop-up, the system provides you with the addresses as they should appear in the .csv file. Manually make the changes to any addresses, and upload again.
Note: The numbers with validated addresses are submitted even if some numbers fail address validation. Remove the ordered numbers from the .csv file, include only the corrected addresses, and reload the file.
For more information on configuring E911 for your numbers, check out the IntelePeer Dynamic 911 Configuration Guide.
Invalid Number Selection
The system validates the numbers to identify any that may already assigned to one or more SmartFlows. If this is the case, you need to unassign the number or numbers from the SmartFlows if you intend on moving or disconnecting the numbers.