Integration with Salesforce
Overview
Through integration with Salesforce, you can easily enable real-time communications into your Salesforce workflows. Build communications enabled workflows and applications using Salesforce, SmartFlows, and Engage.
Integrating with Salesforce
Getting Started
Log into your Salesforce account, and go to Admin Settings.
Connected App Creation
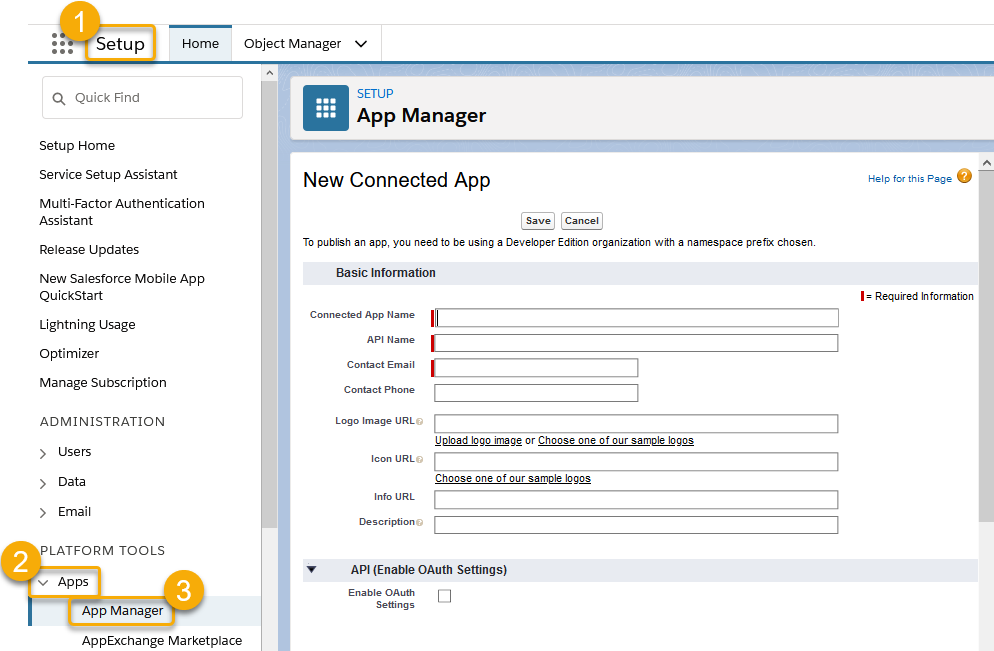
- Go to Setup > Apps > App Manager. Click the New Connected App button.

- Enter the required fields and any other optional fields as appropriate.
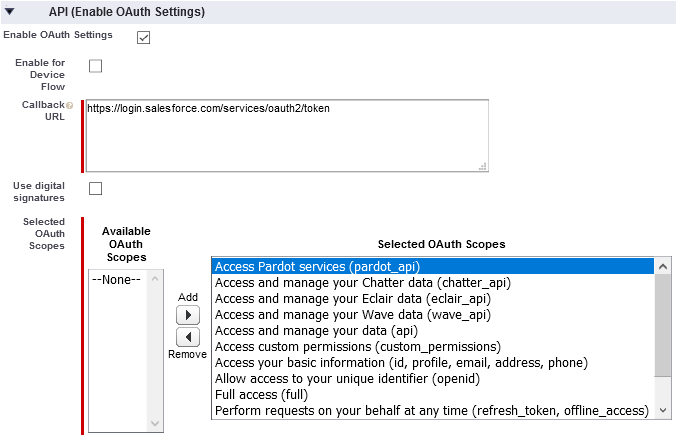
- Activate the Enable OAuth Settings.
- Enter the call back URL: https://login.salesforce.com/services/oauth2/token
- Select all the items under the Available OAuth Scopes list, and click the Add button to add them to the Selected OAuth Scopes list.

- Click Save and Continue.
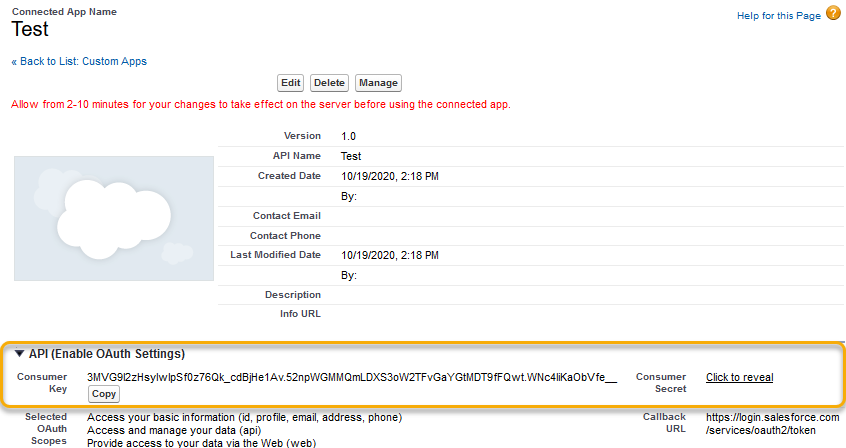
- Use the Consumer Key, Consumer Secret, and user credentials (username, password) to create the request URL to connect to Salesforce.

Getting Access Token from Salesforce Through REST API
You need to have an access-token to make an API request. In this process, you use Salesforce username, password, consumer key, and consumer secret to achieve it.
- Open the Postman REST client.
- Change the value to POST.
- Click the Authorization tab.
- For the Type, select Bearer Token.
- In the Token field, enter the access_token returned from the Getting access token from Salesforce through REST API step.
- Change the Authorization Type to OAuth2.0.
- Enter the following URL: https://login.salesforce.com/services/oauth2/token
- Enter the following key/value parameters under the Params tab:
| Key | Value |
|---|---|
| grant_type | password |
| client_id | {your Salesforce Consumer Key – generated from the Connected App Creation step} |
| client_secret | {your Salesforce Consume Secret – generated from the Connected App Creation step } |
| username | {your Salesforce user Login} |
| password | {your Salesforce Password} |
The above params generate the correct URL for the request. The following is an example of the URL for the access token request:
https://login.salesforce.com/services/oauth2/token?grant_type=password&client_id=3MVG9yZ.WNe7cyQBMXq.PrTbt537gjQ1Ms5SdBsrLLmJ7lTo9T.wANyJvboB1BNeKRLKcUdf1cnp_3ZUtAGCO&client_secret=876CF1EA0801B5683C889921FACDF7BB963FC2B21FB9F26893EE7C5D62A5CE53&username=user@intelepeer.com&password=eGqF5k6Xfg69Fb
Response
{
“access_token”: “00D0n0000000PTP!AQIAQAu4SllatFOZjFeer_QIzDu__DfYvlKBFpKXXXXXXXXXXXXXXXXXXXXX”,
“instance_url”: “https://.my.salesforce.com”,
“id”: “https://test.salesforce.com/id/00D0n0000000PTPEA2/005A0000000iem0IAA”,
“token_type”: “Bearer”,
“issued_at”: “1548668798292”,
“signature”: “YsLA8OVynXSo3kw4GVgzlWPAKm6Mzt0XXXXXX
}Connecting to Salesforce Using the Access Token
- Choose request type POST and enter the following URL: https://<Your Salesforce Instance>.my.salesforce.com/services/apexrest/postSms
- Click the Authorization tab.
- For the Type select Bearer Token.
- In the Token field, enter the access_token returned from the Getting access token from Salesforce through REST API step.
- Click the header.
- In the header, select the key value Authorization and assign its value with the following:
Bearer 00D0n0000000PTP!AQIAQDPwh.SjwLKwPubL3eK41Ab7fWeBPwjq0r6XHZADyq2xDU87mfRNnMeZeTOQcpoQfHVxVYh49EoIE9COnAunyzka5hSb
- Add the following key/value parameter:
| Key | Value |
|---|---|
| Content-Type | application/json |
- Click body.
- Enter the parameters in JSON format.
- Click Send.
- See the status and received values from the API call.
Method: POST
URL: https://<Your Salesforce instance>.my.salesforce.com/services/apexrest/postsms
Authorization: access_token
Content-Type: application/json
Body:
Enter the Salesforce contact’s mobile number for the ANI parameter value:
{
“ANI”:”+17017318901″,
“message_Body”: “Hello from Postman send text to Salesforce contact”
}Changes Reflected in Salesforce
- You can see the message received in the chat box.
- After the successful API request, a related record is created in the SMS Storage object.