Creating an AWS Lambda Serverless Function to Execute a SmartFlow
This tutorial guides you through the creation of a serverless function using AWS Lambda that allows you to execute a SmartFlow.
Create a Function
- Login or create an AWS account.
- On the AWS Management Console, under All services, select Lambda.
- Click the Create function button.
- Choose Use a blueprint, type "hello" into the box, and select the Hello-World example for the language of your choice.

- Give your function a Name. Select Create a new role with basic Lambda permissions from the Execution role options.
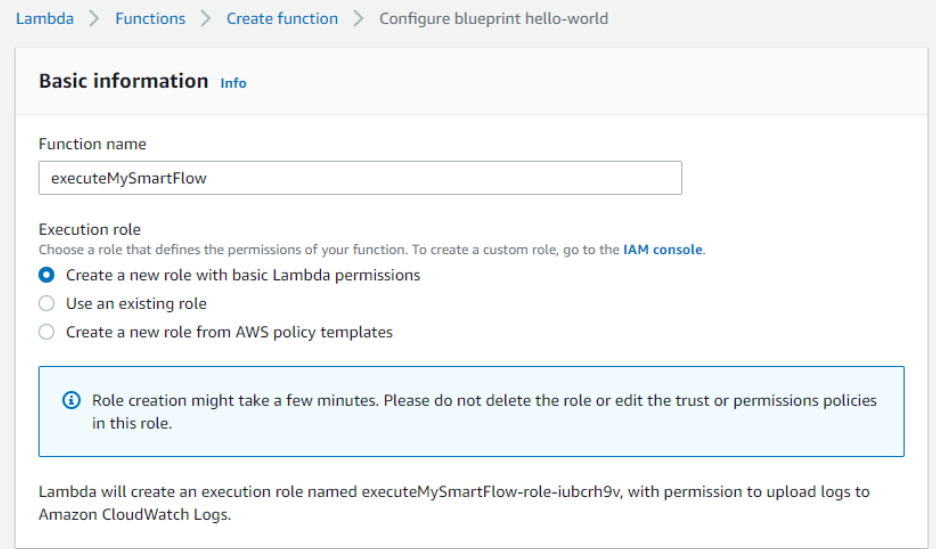
- Click Create Function at the bottom of the page.
- Replace the default code with the following:
Copy
const https = require('https');
exports.handler = async (event, context) => {
return new Promise((resolve, reject) => {
postSmartFlowsData(event.user_id, event.text)
.then((response) => {
const data = JSON.parse(response);
context.succeed('Smartflows sent: ' +JSON.parse(response).msgBody);
})
.catch((err) => {
//set an optional error message here
context.fail( err.message);
})
});
};
const postSmartFlowsData = function(intent, msgText) {
return new Promise((resolve, reject) => {
var https = require('https');
var data = JSON.stringify({
ANI: '<Enter A Source Identifier>',
msgIntent: intent,
msgBody: msgText,
DNIS: '<Enter A valid number from your account>',
flowId: '<Enter Your Flow ID>'
<<ADD ADDITIONAL PARAMETERS HERE>>
});
const options = {
host : "smart-flows.intelepeer.com",
protocol: "https:",
method : "POST",
port:443,
path: "/v2/api/apitriggers",
headers : {
"Content-Type": "application/json",
"Accept": "application/json",
"Content-Length" : Buffer.byteLength(data)
},
body: data
};
console.log(options);
const req = https.request(options,(response) => {
if (response.statusCode < 200 || response.statusCode > 299) {
reject(new Error('Failed with status code: ' + response.statusCode));
}
const body = [];
response.on('data', (chunk) => body.push(chunk));
response.on('end', () => resolve(body.join('')));
});
req.on('error', (err) => reject(err));
req.write(data);
req.end();
})
};Enabling Access to Your Function
Note: Excerpts of this section are taken from here.
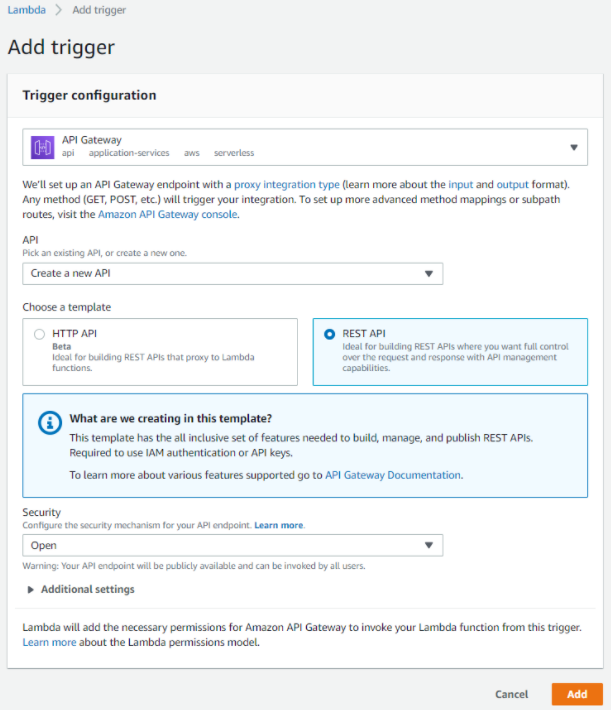
- Now that we have the code setup we need a way to execute the code. Select Add Trigger.
- Select API Gateway, set API to Create a new API, select the REST API Template, set Security to Open, and click Add.
- Select your API from the API Gateway section.
- Click the Create Method button in the top right, and select POST from the drop down on the left (and click the small tick).

- In the Integration type select Lambda Function, and select the region your AWS account is set to. Start typing for a list of your lambdas to appear.
- Click Save.
- On the following screen click the box Integration Request and scroll down to the Mapping Requests section.
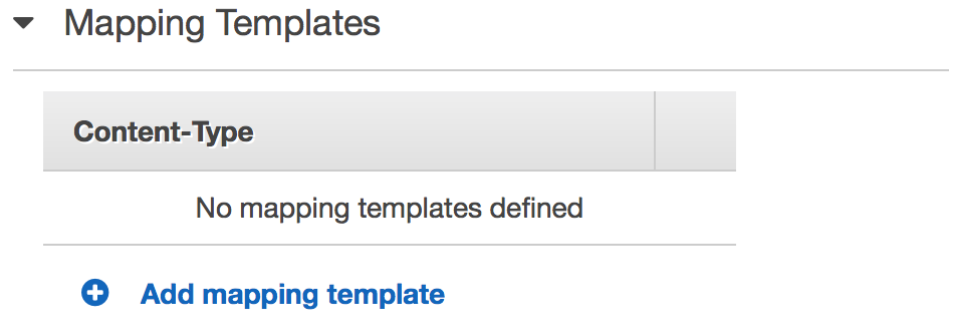
- Click Add mapping template and type "application/x-www-form-urlencoded" into the box and click the small tick. Click the pen icon next to the word Input passthrough and select Mapping template from the drop-down.
- In the Template box add this code:
Copy
## convert HTML POST data or HTTP GET query string to JSON
## get the raw post data from the AWS built-in variable and give it a nicer name
#if ($context.httpMethod == "POST")
#set($rawAPIData = $input.path('$'))
#elseif ($context.httpMethod == "GET")
#set($rawAPIData = $input.params().querystring)
#set($rawAPIData = $rawAPIData.toString())
#set($rawAPIDataLength = $rawAPIData.length() - 1)
#set($rawAPIData = $rawAPIData.substring(1, $rawAPIDataLength))
#set($rawAPIData = $rawAPIData.replace(", ", "&"))
#else
#set($rawAPIData = "")
#end
## first we get the number of "&" in the string, this tells us if there is more than one key value pair
#set($countAmpersands = $rawAPIData.length() - $rawAPIData.replace("&", "").length())
## if there are no "&" at all then we have only one key value pair.
## we append an ampersand to the string so that we can tokenise it the same way as multiple kv pairs.
## the "empty" kv pair to the right of the ampersand will be ignored anyway.
#if ($countAmpersands == 0)
#set($rawPostData = $rawAPIData + "&")
#end
## now we tokenise using the ampersand(s)
#set($tokenisedAmpersand = $rawAPIData.split("&"))
## we set up a variable to hold the valid key value pairs
#set($tokenisedEquals = [])
## now we set up a loop to find the valid key value pairs, which must contain only one "="
#foreach( $kvPair in $tokenisedAmpersand )
#set($countEquals = $kvPair.length() - $kvPair.replace("=", "").length())
#if ($countEquals == 1)
#set($kvTokenised = $kvPair.split("="))
#if ($kvTokenised[0].length() > 0)
## we found a valid key value pair. add it to the list.
#set($devNull = $tokenisedEquals.add($kvPair))
#end
#end
#end
## next we set up our loop inside the output structure "{" and "}"
{
#foreach( $kvPair in $tokenisedEquals )
## finally we output the JSON for this pair and append a comma if this isn't the last pair
#set($kvTokenised = $kvPair.split("="))
"$util.urlDecode($kvTokenised[0])" : #if($kvTokenised[1].length() > 0)"$util.urlDecode($kvTokenised[1])"#{else}""#end#if( $foreach.hasNext ),#end
#end
}- Click the small tick to save these settings and select Deploy API.
- In the pop-up box that follows select New Stage and type "prod" into the Stage name. Click Deploy to get your code live.
- At the top of the page you should now be given a HTTPS URL (similar to https://xyz.execute-api.zone-1.amazonaws.com/prod).