How to Design a Query
Base URL: https://api.intelepeer.com
If you haven't done so, take some time to review the Insights API Overview topic, which provides additional background and examples.
Before You Begin
Prior to designing and executing a query, make sure you have:
-
API access (by creating a new user or editing an existing user in the IntelePeer Customer Portal > User Management).
-
Retrieved an authentication token.
Note: The token is valid for 24 hours.
-
Made a query request to identify the data schemas and schema fields available in the Data API.
Note: Common fields are used in every schema.
-
Determined your timeframe (beginning and ending time) for your query in UTC. This is required to make your query request.
Note: Once you run your query, you can access your results file in your S3 bucket.
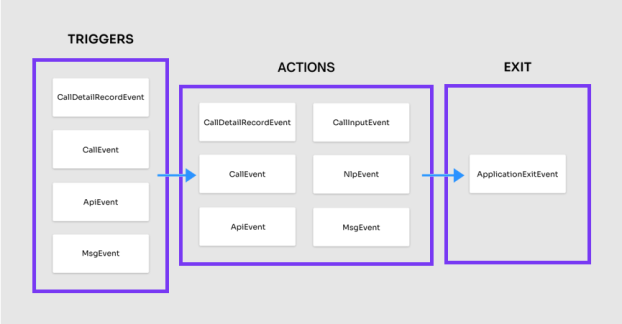
What the Data Looks Like
Each Flow has a Session associated with Actions and Events (much like a web session). Each individual action in an event has a unique transaction. Every Flow includes a unique value and ApplicationExitEvent, providing what took place in the Flow: for example, the path it took, the reason for the exit, and time spent at each individual action.
Note: Once triggered, the actions can be from any of the event tables, in any order, and at any frequency.
To Create a Query
Note: The query is passed in the body of the request, Accept and Content-Type are application/json, the bearer token is passed as authorization, and returns the GUID of the request (used to see the status and the file location in the S3 bucket).
-
Choose a filter setting. Filtering is optional, and you can use one or both:
-
data: final filtering phase, explicitly determines which records appear in the report.
-
scope: initial filtering phase, expands the scope to all records within matching sessions.
-
Example 1
The data filter is strict and isolates results to individual records that match all criteria.
{
  "data": {
    "event1": {
      "fields": [
        "event1_Field1",
        "event1_Field2"
      ]
    },
    "event2": {
      "fields": [
        "event2_Field1"
      ]
    }
  }
}
Example 2
The scope filter is broad. With only one match, it provides all records associated with a user session. It needs a data filter to work.
{
   "timestamp": {
     "$gte": "2019-12-16T00:00:00Z",
     "$lte": "2019-12-21T00:00:00Z"
   },
   "data": {
     "CallEvent": {
       "fields": [
         "EventName",
         "EventVersion",
         "EventSku",
         "TimeStamp",
         "HostId",
         "CustomerId",
         "FlowId",
         "FlowName",
         "ActionId",
         "ActionName",
         "IsTriggerAction",
         "SessionId",
         "TransactionId",
         "ApplicationRegion",
         "PassthroughVersion",
         "IsOutboundFromCust",
         "CallingNumber",
         "CalledNumber",
         "CalledNumberCountry",
         "CalledNumberState",
         "CalledNumberRegion",
         "CallOfferTime",
         "CallAnswerTime",
         "CallEndTime",
         "CallDuration",
         "CallAnswerIndicator",
         "CallVoicemailDetected",
         "CallDisconnectReason"
       ]
     }
   },
   "filters": {
     "CallEvent": {
       "CallingNumber": {
         "$eq": "+18052091817"
       }
     }
   }
 }
-
Once a filter is set, identify the focus of your search. For example, use the timestamp attribute to filter for records (or verbs) that occur between 4:30pm and 7:30pm MDT on February 11, 2019.
Note: All records are stored in 24-hour UTC format including seconds. For example, 6:30pm becomes 18:30:00 in 24-hour format. For timezone MDT (-0600), we add six (6) hours to create 00:30:00.
4:30pm MDT -> 16:30 MDT -> 22:30 UTC -> 2019-02-11T22:30:00Z
7:30pm MDT -> 19:30 MDT -> 01:30 UTC -> 2019-02-12T01:30:00Z
{
  "timestamp": {
    "$gte": "2019-02-11T22:30:00Z",
    "$lte": "2019-02-12T01:30:00Z"
  }
}
Now indicate at least one (1) column for the report:
{
  "timestamp": {
    "$gte": "2019-02-11T22:30:00Z",
    "$lte": "2019-02-12T01:30:00Z"
  },
  "data": {
    "ApplicationExitEvent": {
      "fields": [
        "FlowId"
      ]
    }
  }
}-
After running and reviewing the report, adjust your filters to provide more or less data.
Analysis: The flow you’re interested in might take place over a long period of time, but the time period is narrow, so the provided records don’t have enough contextual information to analyze.
To do cooperative filtering and receive all related session records, switch to using the scope filter.
This yields many more results, because there are two searches:
-
Find any record (verb) with CallingNumber "+17652285679"
-
Next, find any record with a matching SessionId
-
Here is the updated query:
{
  "timestamp": {
    "$gte": "2019-11-25T00:00:00Z",
    "$lte": "2019-11-26T00:00:00Z"
  },
  "data": {
    "ApplicationExitEvent": {
      "fields": [
        "FlowId"
      ]
    }
  },
  "scope": {
    "field": "Sessionid",
    "filters": {
      "CallEvent": {
        "CallingNumber": {
          "$eq": "+17652285679"
        }
      }
    }
  }
}-
Once you have the full flow of information, you can refine your search results to see API callouts associated with sessions related to the CallingNumber "+17652285679"
That query would look like this:
{
  "timestamp": {
    "$gte": "2019-11-20T00:00:00",
    "$lte": "2019-11-20T23:00:00"
  },
  "data": {
    "MsgEvent": {
      "fields": [
        "EventName",
        "EventVersion",
        "TimeStamp",
        "SessionId",
        "SendingId",
        "SentId"
      ]
    }
  },
  "filters": {
    "MsgEvent": {
      "TimeStamp": {
        "$gte": "2019-11-15T00:00:00Z",
        "$lte": "2019-11-23T00:00:00Z"
      }
    }
  }
}
Accessing Your Query Results File
After your query has a status of Completed, you can access your results file from S3 using an FTP utility. The files are produced in .csv format.
For this example, we are using FileZilla.
Note: The system may require several minutes to process your request and generate the resulting file or files.
-
Check the status of your query. When you first run the query, the status is Pending. Once the query has successfully run, the status changes to Completed.
-
Once the query has completed, in the Customer Portal > Enterprise Settings > SFTP tab, in the read-only fields, record the SFTP URL and your Customer ID.
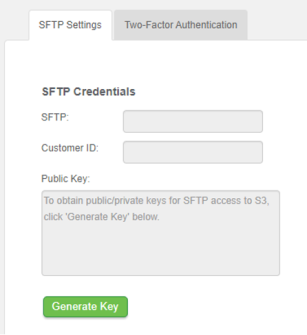
Note: The URL and Customer ID are used when connecting to S3 with your FTP utility. Make sure to check your destination folder for more than a single file as it’s possible your request can generate multiple files.
-
Click Generate Key to create the public / private keys for SFTP access to S3. The key appears in the Public Key field.
-
Create a key file by copying and pasting the key you generated into a .txt or .ppk file. Save the key file to your system or locally.
-
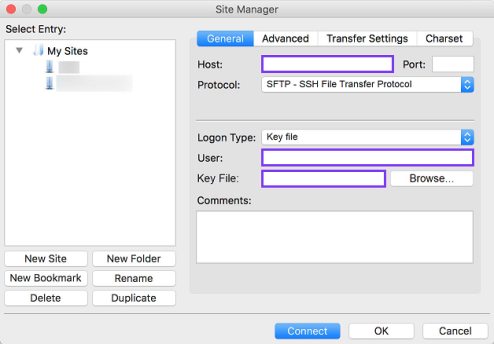
Open your FTP utility. In FileZilla, go to Site Manager.
-
In the Host field, enter the SFTP URL you recorded from the Customer Portal.
-
From the Logon Type menu, select Key File.
-
In the User field, enter the Customer ID you recorded from the Customer Portal.
-
Browse to the key file you created and select it.
-
Click Connect. You can now navigate in your S3 bucket to the file or files you generated with your query.