How to Build an Analysis Agent
This guide describes how to configure an Analysis Agent. Learn more about:
Overview
Analysis Agents differ from other agents in that they are not used to orchestrate conversational experiences and instead are used to analyze interactions and create insights about the conversation. This agent returns data about an interaction in a structured format so that it can be consumed in a consistent and accurate way. Analysis Agents can capture and then pass on interaction data during an experience (via JSON output), or evaluate interaction data after an experience (via a tool call).
For example, if a user calls in an order for a prescription refill, the associated data (patient name, prescription name, etc.) can be captured in a consistent JSON format and sent to a downstream application for processing. Meanwhile, the caller continues their interaction, going through the payment processing steps or answering any questions about their medication.
Before You Begin
You must have account API access and a JWT Bearer token to use the AI API endpoint below. Check out this page for more information.
Build an Analysis Agent
-
Log into your account through the Customer Portal.
-
Click the AI Studio tile to open the app.
-
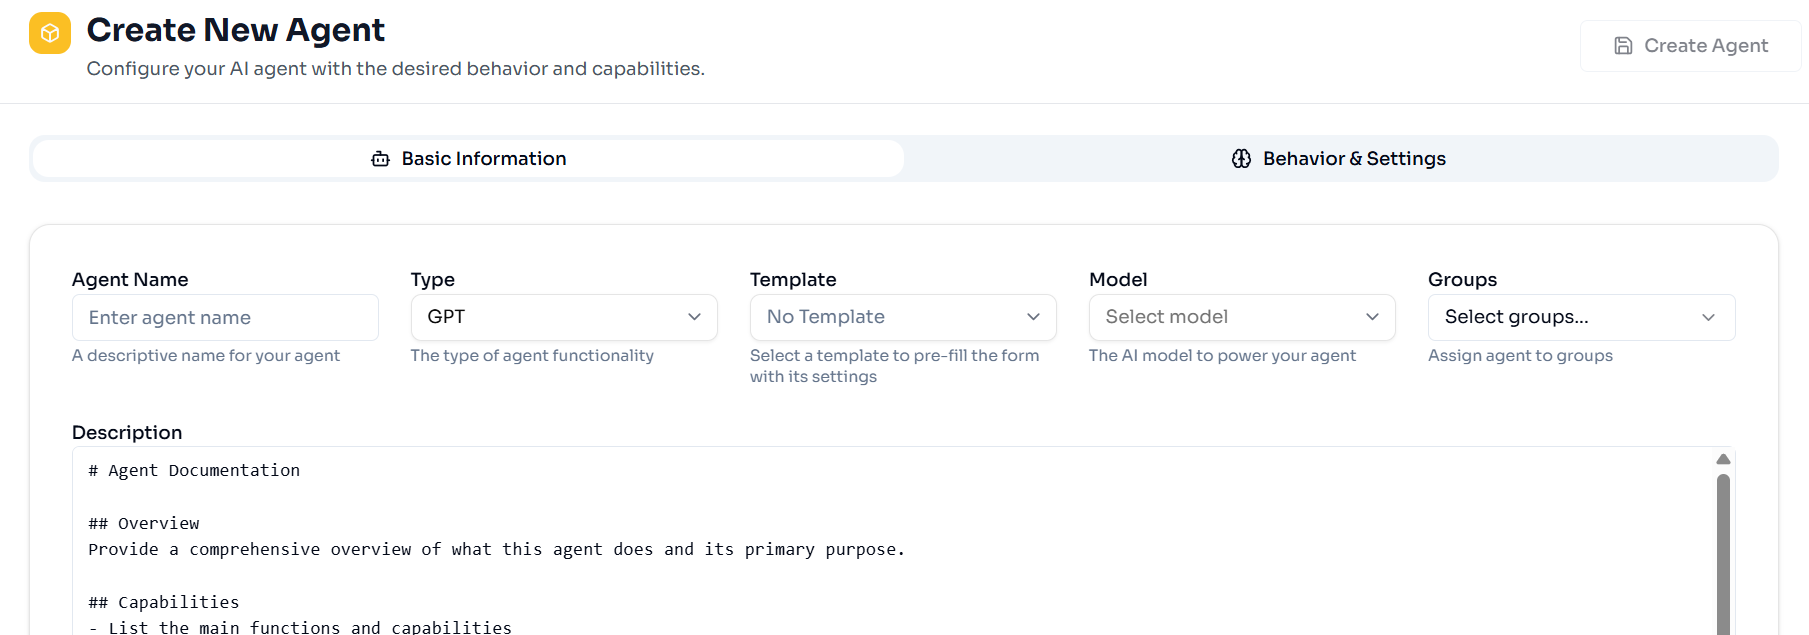
From the Agent page, click + New Agent button above the table. The Create New Agent page appears.
-
Fill in the details about your agent:
-
Name: Give your agent a unique and descriptive name. For example, “Call Center Evaluations”.
-
Type: Select “ANALYSIS” from the drop-down list.
-
Template: If you have previously created a templates it will appear in the drop-down list, and you can select the appropriate one for your agent. Otherwise, you can leave this field with the default ("No Template").
-
Model: Select “GPT4o-mini”, the only LLM supported for Analysis Agents.
-
Groups: If you previously defined AI Workflow Groups they will appear in the drop-down list, and you can select the group(s) you want to associate this agent with. Otherwise, you can leave this field blank.
-
Description: Provide a helpful, descriptive blurb about your agent. For example, “Analysis of call center call recordings".
-
Click the Behavior & Settings section to view the System Prompt, Output Structure, and Parameters subsections.
-
System Prompt: Instructions for your agent to guide responses. Include the context for what the agent is doing, instructions for the agent, etc.
-
You might want to include information about the Evaluation Criteria or rules the agent should follow.
-
-
Output Structure: You can select either “Tools” or “JSON Output” depending on your use case.
-
Choose “Tools” if you want the agent to fire a tool based on the interaction it analyzes.
-
You must define at least one tool.
-
We recommend including only one tool, with multiple properties.
-
-
Choose “JSON Output” if you want the agent to provide structured JSON data collected from the interaction.
-
You must define the schema that is produced.
-
-
-
Parameters: LLM and workflow settings.
-
Generally, we recommend keeping the default values in this section.
-
-
-
-
Click Create Agent.
We recommend reviewing all of your setting to make sure everything is correctly saved and captured. Any formatting or spelling errors, especially in the Behavior & Settings section, should be updated before you continue.
Sample Agent Prompts and Output Structure
Depending on the type of Analysis Agent you are configuring, the System Prompt and Output Structure sections will be different. Below is an example for each Output Structure type.
Sample System Prompt and Output Structure Configurations for “Tools” Output Structure
System Prompt
Output Structure
[
	{
		"name": "evaluate_conversation",
		"description": "provide an evaluation of the live agent's handling of the call",
		"parameters": {
			"type": "object",
			"properties": {
				"needs_assessment_evaluation": {
					"type": "string",
					"description": "your reasoning for the needs_assessment_score you provided"
				},
				"needs_assessment_score": {
					"type": "string",
					"description": "On a scale from absent to outstanding, your score of the live agent's handling of the call according to the details of the Needs Assessment criteria.",
					"enum": [
						"absent",
						"unacceptable",
						"poor",
						"inadequate",
						"below_average",
						"fair",
						"average",
						"good",
						"very_good",
						"excellent",
						"outstanding"
					]
				},
				"problem_resolution_evaluation": {
					"type": "string",
					"description": "your reasoning for the problem_resolution_score you provided"
				},
				"problem_resolution_score": {
					"type": "string",
					"description": "On a scale from absent to outstanding, your score of the live agent's handling of the call according to the details of the Problem Resolution criteria.",
					"enum": [
						"absent",
						"unacceptable",
						"poor",
						"inadequate",
						"below_average",
						"fair",
						"average",
						"good",
						"very_good",
						"excellent",
						"outstanding"
					]
				}
			},
			"required": [
				"needs_assessment_evaluation",
				"needs_assessment_score",
				"problem_resolution_evaluation",
				"problem_resolution_score"
			]
		}
	}
]
Sample System Prompt and Output Structure Configurations for “JSON Output” Output Structure
System Prompt
You are a Pizza Ordering Assistant.
Your job is to take a customer's natural language request about ordering pizza and convert it into structured JSON data that matches the Pizza Ordering API schema.

Follow these rules:

Always output valid JSON that strictly conforms to the schema provided.

Do not include extra text, explanations, or apologies — output only the JSON object.

Normalize sizes, crusts, and toppings into standard values when possible (e.g., “large” → "large", “deep dish” → "deep_dish").

If multiple pizzas are requested, represent them as separate items in the pizzas array.

If a value is missing, leave it as null.
Output Structure
{
	"$schema": "http://json-schema.org/draft-07/schema#",
	"title": "PizzaOrder",
	"type": "object",
	"properties": {
		"customer_name": {
			"type": ["string", "null"],
			"description": "Optional customer name if provided in the request."
		},
		"pizzas": {
			"type": "array",
			"items": {
				"type": "object",
				"properties": {
					"size": {
						"type": ["string", "null"],
						"enum": ["small", "medium", "large", "extra_large", null],
						"description": "Pizza size."
					},
					"quantity": {
						"type": "integer",
						"minimum": 1,
						"default": 1,
						"description": "Number of pizzas of this type."
					},
					"toppings": {
						"type": "array",
						"items": {
							"type": "string"
					},
					"description": "List of toppings requested (e.g., pepperoni, cheese, mushrooms)."
				},
				"crust": {
					"type": ["string", "null"],
					"enum": ["thin", "hand_tossed", "deep_dish", "stuffed", null],
					"description": "Type of crust requested."
				}
			},
			"required": ["size", "quantity", "toppings", "crust"]
		}
	}
},
"required": ["pizzas"]
}
Test Your Agent
Once your agent is saved and published, we recommend testing it to confirm it’s working as expected.
Via API
Endpoint: POST apps/v2/agent/{agent_id}/{action}
At this time, {action} will always be “response” and you can append your customer_id and session_id. For example, POST https://aiservice.intelepeer.com/apps/v2/agent/68a4e8f6c18186ec89f514bb/response?customer_id=9999999&session_id=mondayDemo.
Test different input in the “user message” section of the body and review the response to confirm your analysis agent functions as expected.
Sample Request Body
{
	"user_message": "...",
	"flow_args": {"transcript": "{Interaction Text}", "asdfasdf": "asdfasdf"}
}
Response Values
The following properties are always returned in the response:
-
request_id (string): A unique identifier for your request
-
output (object|null): The agent's response (this will be “null” if your request failed)
-
error (boolean): Indicates whether the execution failed (“true”) or succeeded (“false”)
-
session_id (string|null): The session identifier used for the request
-
errors (array|null): List of error messages encountered during execution
-
is_tool_call (boolean): Indicates whether the response came from a tool call
-
tool_call (object|null): Information about the primary tool call made (if any)
-
tool_calls (array|null): List of all tool calls made during execution
-
ai_raw_output (object|null): Raw output from the LLM including token usage and model information
Sample Success Responses
"Tools" Output Structure Example
{
	"request_id": "97d4893d-c76e-4eda-9abd-c7a00191eeb6",
	"output": {
		"bias": 0
	},
	"error": false,
	"warnings": [],
	"errors": [],
	"session_id": "12345",
	"is_tool_call": true,
	"tool_call": {
		"name": "bias_determinator",
		"content": "{\"bias\":0}",
		"tool_call_id": "call_eNRspLGUzhXhWOtlfHan2nc9"
	},
	"tool_calls": [
		{
			"name": "bias_determinator",
			"content": "{\"bias\":0}",
			"tool_call_id": "call_eNRspLGUzhXhWOtlfHan2nc9"
		}
	],
	"ai_raw_output": {
		"token_usage": {
			"completion_tokens": 17,
			"prompt_tokens": 72,
			"total_tokens": 89,
			"completion_tokens_details": {
				"accepted_prediction_tokens": 0,
				"audio_tokens": 0,
				"reasoning_tokens": 0,
				"rejected_prediction_tokens": 0
			},
			"prompt_tokens_details": {
				"audio_tokens": 0,
				"cached_tokens": 0
			}
		},
		"model_name": "gpt-4o-mini-intelepeer",
		"system_fingerprint": "fp_efad92c60b"
	}
}
"JSON" Output Structure Example
{
	"request_id": "ce40c836-11ad-49b6-a8f5-9e80c39aeb16",
	"output": {
		"bias": 1.0
	},
	"error": false,
	"warnings": [
		"Unused flow args: ['asdfasdf']"
	],
	"errors": [],
	"session_id": "12345",
	"is_tool_call": false,
	"tool_call": null,
	"tool_calls": [],
	"ai_raw_output": {
		"token_usage": {
			"completion_tokens": 12,
			"prompt_tokens": 105,
			"total_tokens": 117,
			"completion_tokens_details": {
				"accepted_prediction_tokens": 0,
				"audio_tokens": 0,
				"reasoning_tokens": 0,
				"rejected_prediction_tokens": 0
			},
			"prompt_tokens_details": {
				"audio_tokens": 0,
				"cached_tokens": 0
			}
		},
		"model_name": "gpt-4o-mini-intelepeer",
		"system_fingerprint": "fp_efad92c60b"
	}
}
Sample Error Response
{
	"request_id": "58569d96-f0a9-43cc-a98a-d569b2194b35",
	"output": null,
	"error": true,
	"warnings": [
		"Unused flow args: ['asdfasdf']"
	],
	"errors": [
		"Missing flow args keys: ['arg_example']"
	],
	"session_id": "12345",
	"is_tool_call": false,
	"tool_call": null,
	"tool_calls": null,
	"ai_raw_output": null
}
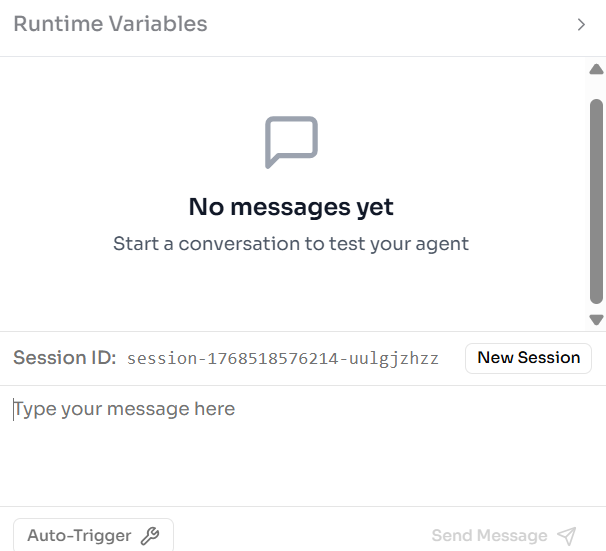
Via the AI Studio
-
From the Agents page, find the tile for your agent and click the Test button (you can also click Edit, and when your agent details appear, click Live Test at the top of the page).
-
On the right side of the screen, fill in sample Runtime Variables with data relevant to your prompt.
-
Type a message in the text box and click Send Message.
-
You can always tweak your configurations (on the left side of the screen) as needed. Just remember to Save Changes if you make any updates.
-
-
Once you’re happy with the performance of your agent you can close the agent and Publish it.
Tips and Best Practices
-
Make sure to use Model “GPT4o-mini”.
-
Select Output Structure “Tools” to fire a tool based on the analyzed interaction (e.g., review call transcripts for scoring). Select Output Structure “JSON Output” to produce structured information collected from the analyzed interaction (e.g., data for an API call in SmartFlows).
-
If you're configuring “Tools” Output Structure:
-
Make sure your tools are well built. If your tools are poorly written, your agent will not perform as expected.
-
At least one tool will always fire. Multiple tools can fire potentially fire depending on your use case.
-